Nov 082012
 
Transplanting tree collard cutting - 2

You have landed on Day 3 in this 5-day series of videos depicting propagation of tree collard cuttings.  Enjoy!


First a video  re “Collard Propagation”.   Today’s video is part 3 of 5 (1/day) for the series!   THEN some collard tree pics (below the video):


Tree Collard Propagation — 3 of 5 videos


Transplanting Tree Collard Cuttings for Propagation (pics):

Transplanting tree collard cutting - 1

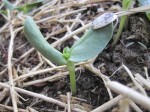
Transplanting tree collard cutting - 1 of 4. Note the bend in the cutting. Could be very difficult to stab this cutting into the ground and keep the leaves off the soil-mulch surface. But working with what we have, we'll lie the cutting on its side. The extra length of cutting (not pruning it back because of the bend) will allow more root development and better ensure propagation.


Transplanting tree collard cutting - 2

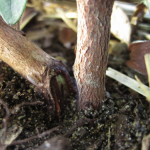
Transplanting tree collard cutting 2 of 4. Perfect fit for this tree collard cutting that has two 90-degree bends in it. Permaculture principle #1 = the problem is the solution. Because of its twists and turns, this cutting has primo real estate in the topsoil layer – look at how well the cutting, or new root system travels horizontally, along the rich microbe-abundant topsoil layer.


Transplanting tree collard cutting - 3

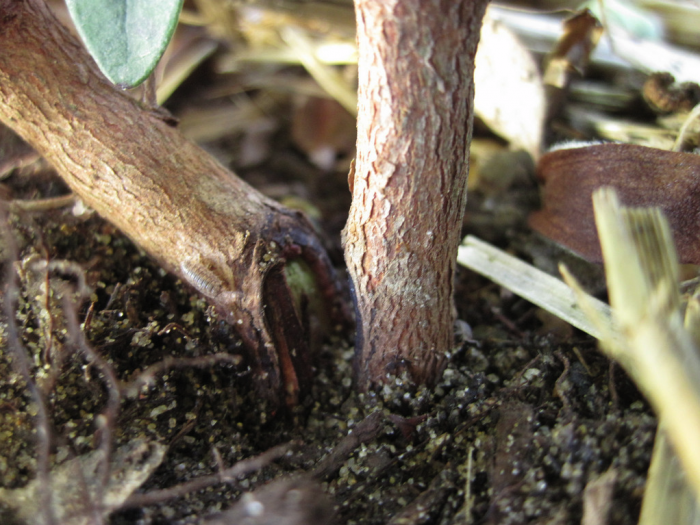
Transplanting tree collard cutting - 3 of 4. The topsoil layer is returned over the cutting. Leave it as you found it. The soil microbes have had a heck of a day (I hate moving!), but they will get a second chance at thriving, alongside the transplanted tree collard cutting. The green manure (boring people call them “weeds”) are also pushed back into place with the lightly packed topsoil. Those plants/greens are going to be mulched over (next pic) so they will boost the existing community of soil microbes. And the soil microbes and the tree collard cutting’s new roots will live happily ever after.


Transplanting tree collard cutting - 4

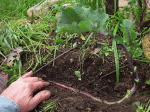
Transplanting tree collard cutting - 4 of 4. Rice straw (old, perhaps last year's bale) is used to mulch over the tree collard cutting. Moisture retention is critical while the cutting decides to thrive or not. Note the chop-and-drop'ed dock plant (lower right); see text below re chop-and-drop.

Note the chop-and-drop’ed dock plant in the above pic (lower right).  Sure it could have been ripped out while I was digging in the transplant.  BUT, I would rather have the dock plant’s large, voluptuous leaves soak in the sun’s rays, create carbon (sugars) and other organic matter in the form of more leaves and a more developed root system.  THEN, I will come along again (for the umpteenth time!) and demand that the plant start all over.  Besides perhaps emotionally scarring Dock, the leaves I’ve collected can be used to make mulch, compost, or salad.  The root system that was supporting all that leaf growth dies back; the leaves are no longer feeding it.  Those died-back roots then become food for the soil as well as organic material that retains moisture for the new roots to come as the dock plant regrows.

Chop and drop video by TrevorsGarden.

Happy collard propagation and see you tomorrow.

Tony


Nov 062012
 
Young Sunflower Plant.

You have landed on Day 6 in this 6-day series of videos depicting the fine art of collecting/processing/storing pumpkin seeds.  Enjoy!


First some pumpkin pics:

Day 1 = flowers

Day 2 = vine

Day 3  = new fruit

Day 4  = green manure

Day 5 = seed saving

Today  = seed planting


THEN a video  re “Saving Happy Halloween Pumpkin Carving Seeds”.   6 videos (1/day) for the series!


Seed Planting


Recording seeds used with camera

Recording seeds used with camera, a portable note taker. These seeds were used to plant Straw Bale Recliner veggie bed, the planting area alongside our sidewalk. We planted first week of July and had a lush patch of sunflowers and pumpkin this fall. Skyward Pumpkins grew in this patch, from these seeds.

To see Skyward Pumpkins, go to Spore Lore’s blog entry at Skyward Pumpkins and Happy Halloween.


Seed Mixing Bowl

Seed Mixing Bowl with mostly green manure seeds -- vetch, fava bean, red clover, and white clover. I am a greedy planter; I want it all! I want my intended crop, perhaps some insectary plants to attract pollinators, and I want some green manure. Note that in the above bowl of seed, I mixed in soil. The soil will allow me to more thoroughly mix the seeds and give them bulk for my inexact hand dispersal (sometimes over my left shoulder).


Mycorrhizae to dust seeds before planting

Mycorrhizae to dust seeds before planting. Improves germination, plant survival, root development, plant happiness, plant emotional security -- JUST USE IT!

Paul Stamets says we can save the world with spore.   He says more spore.  I say Spore Lore!


Dusted Sunflower and Pumpkin Seeds

Dusted Sunflower and Pumpkin Seeds. The black dust is mycorrhizae spore; the granules might be spore, might be a nutrient. The black and white-striped seeds (left) are mammoth sunflower. The solid white seeds (top right) are pumpkin.


Planting out a sunflower-pumpkin patch.

Planting out a sunflower-pumpkin patch. Spore-dusted seeds sprinkled and ready to go. Bed half planted (might be siesta!).

Covering planted seeds with a layer of rice straw.

Covering planted seeds with a layer of rice straw to provide mulch and to protect the seeds. The thin layer of straw will provide enough cover to deter birds and other critters from eating the seed, will keep water from washing the seeds away, and will discourage neighborhood cats from claiming the veggie bed as a litter box.


Pumpkin plant on its way!

Pumpkin plant on its way! Note how the seed husk was lifted out of the soil and through the mulch layer by the young plant. Also note how the mulch is in place at germination -- the plant does not have to be disturbed -- it and its mulch pack are ready to go. Just add water and sunlight.

Young Sunflower Plant.

Young Sunflower Plant boasting its seed husk. Note the delicate young red-purple amaranth seedlings off to the right of the sunflower seedling.

Saving Happy Halloween Pumpkin Carving Seeds — 6 of 6

Happy seed saving and see you tomorrow.

Tony


Oct 222010
 

Garden Log:

  1. Fed Mexican lime, Kaffir lime, and Lemon Guava kitchen scraps before mulching with earthworm harvest, wood chips, granular spore, and a sprinkle of water.
  2. Chop and drop throughout the back garden.
  3. dock and comfry grown for "chop and drop"

    Western Fence Lizard Liar with dock (left) and comfry (back right) grown for "chop and drop". Insects will come to eat the red currant berries (taller green plants alongside slate) and lizards from the rockpile habitat will feast on the insects.

    Wood chip mulched Hister Beetle Huckleberry Habitat, apple and pear trees, and Sea Lion Splash’s kiwi vine.

  4. Harvested white clover mulch from under Norwegian Hill Basket to seed/mulch Salamander Redwood Lodge with white clover.
  5. Digging in SSSC’s Lower Chamber, slowly but surely. Lined waiting toilet tanks with cardboard over holes in bottom. Filled tanks with wood chip.
  6. Prepared 15 gallon tubs with layered alfalfa and clay from SSSC. Tubs stored near Earthworm Box and will be used to mix material into box contents. Also layered 15 gallon tubs under deck that wick water to jasmine and grape; top layer is adobe so rotting alfalfa does not stink too bad.
  7. Tied string around split trunk of huckleberry.

To you, the Habitat Gardener:

  1. About those 15 gallon nursery pots used to wick water (#6, above), that’s my solution to not having drip irrigation EVERYWHERE. Sure, everywhere would be most efficient, but I do wallow in procrastination at times. The wicking pots, also provide a place to make poor soil good soil, as the mulch breaks down AND it’s habitat. All that soil/clay/mulch/wood chips/water — you know there’s a multicultural neighborhood going in those pots.
  2. “Chop and Drop” (#2, above) is about carbon farming — plants grown for their ability to harness the sun’s energy and turn it into green leafage.  Both the comfrey and the dock in your garden can be grown “as weeds”, leafing out wherever you want to build soil.  The plant grows, you chop it down, NOT PULL IT OUT.  That dock or comfrey plant will grow back, you will chop it again, Pete and repeat.  The beauty of your labor will be making soil.  As the plant grows, it will send out roots.  Chop to ground level, and those roots die back AND, in the process of dieing back, leave organic matter in your soil.  Not only has the plant busted its root down into the soil, but also it will leave some of the water and organic matter in it behind when the above-surface life is cut from it.  And even better, the comfrey will also nitrogen fix the soil.  In other words, the rhizomes clinging to the comfrey roots will release nitrogen into the soil when the root dies back.   Emphasis on “when” there because most gardeners that grow comfrey as companion plants in their gardens don’t realize that significantly more nitrogen is released when the rhizome dies back.  Chop to the ground, release nitrogen to the subsoil, mulch the surface with the nitrogen-rich leaves, and know that that comfrey plant will thrive again, to be chopped again.  You might want to get to the comfrey before it goes to seed; controlling the rhizome spreading plant is challenging enough.  Also note that the comfrey is a very medicinally useful plant.  As for dock, the very young (inner) leaves are tasty raw by themselves and in salads.  Don’t forget that mega salad you’ve got growing in the back of the garden, AKA “the compost pile” — dock greens are a great way to jumpstart the pile.
  3. For huckleberry trunk repair (#7, above), I used 1/2 of garden twine (knotted one end and split the string open) to create a thin strand that will decay by the time the plant is ready to bust loose from the bondage. I had thought that the huckleberry shrub was dying from a water issue but then found that the trunk was split during planting. Since planting this spring, the wound seems to have healed partially and the plant has bulked up — it’s going to live! The berries will be enjoyed by many critters, including me and the birds. Check out the pics to today’s repair job for that split huckleberry trunk below or at: BEFORE and AFTER.

Save a life (yes, plants count), enjoy a berry or two.

Tony