Feb 162013
 

Yesterday, Valentine’s Day, was the start of  new layers to our animal habitat/veggie bed hugelkultur, Food Ridge West.  The new layers are pine tree prunings, horse manure, and organic vineyard compost and can be seen in my post  Happy Valentines Day AND Garden What You Love

Final touches to the pine limb layer are shown in this video:


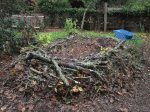
A straw bale holding bin was constructed on our driveway to stockpile soil-making material till moving them to the hugelkultur.  Also, the rectangle box, or “corral”, would be a good place for the compost company to dump the ordered organic vineyard compost.

Soil corral reinforced with cardboard corner.Soil corral reinforced with cardboard corner.  The cardboard gives structure to the straw housing and prevents leakage between the bales.  The rough concrete driveway is lined with a cardboard floor and folded up the sides of the bales.  Easier cleanup of the concrete and less leakage of the corral’s contents.  The manure and compost impregnated cardboard will be composted, perhaps thrown in the bottom of another hugelkultur after we clean up this project.

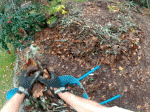
A couple of pickup truck bed loads of manure were used to line the bottom of the corral so that the vineyard compost could be dumped on top.  Shoveling out the pile into wheelbarrow loads then mixed the two soil additives to be dumped onto the hugelkultur.

Early stage of manure and compost bin.
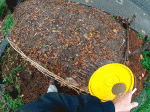
Early stage of manure and compost bin.  The bin was expanded with more bales, and a second tier of bales was added, to fit the incoming vineyard compost mix.

And here comes the dump truck!


Have a happy hugelkultur habitat day!

Tony

Dec 142012
 
Heavy limbs weighing down the lighter sticks on Food Ridge West.


Today is my fourth posting of rebuilding hugelkultur Food Ridge West.

Go to Hugelkultur to see a description of this European garden art.

Today’s video shows the final stages of building the base of the hugelkultur.  Its “keyhole garden” shape is discussed.

Hugelkultur 4 of 4 (video):


From Tony’s project (pics):

Heavy limbs weighing down the lighter sticks on Food Ridge West.  Heavy limbs weighing down the lighter sticks on Food Ridge West.  This woody mesh of twigs, sticks, and limbs makes a good base for organic debris layers to come.  Note all the nooks and crannies that will be available to garden critters.  HABITAT!!!


Entrance to the keyhole garden hugelkultur, Food Ridge West.Entrance to the keyhole garden hugelkultur, Food Ridge West.


Close-up view of entrance to the keyhole garden hugelkultur, Food Ridge West.Close-up view of entrance to the keyhole garden hugelkultur, Food Ridge West.   The added layers of organic debris will rise over the vertical log (left, inside the keyhole garden bed), only to settle back down again next year.  Each year’s added layers mean better soil for crops.


Some images of hugelkultur.

For a detailed discussion,

clear graphics, and lots of pics of hugelkultur,

see Paul Weaton’s blog at:Click to go to Paul Weaton's blog entry on Hugelkultur.


Happy hugelkultur habitat making.  See you tomorrow.

Tony

Dec 142012
 
Added lighter twigs, then heavier sticks and limbs to the hugelkultur.

Today is my third posting of rebuilding hugelkultur Food Ridge West.

Go to Hugelkultur to see a description of this European garden art.

Today’s video shows working lighter sticks first, then heavier sticks on top.  Hugelkultur Building 101!

Hugelkultur 3 of 4 (video):


From Tony’s project (pics):

Added lighter twigs, then heavier sticks and limbs to the hugelkultur.Adding lighter twigs, then heavier sticks and limbs to the hugelkultur.  The heavier limbs will help compress the organic debris pile.


Some images of hugelkultur.

For a detailed discussion,

clear graphics, and lots of pics of hugelkultur,

see Paul Weaton’s blog at:Click to go to Paul Weaton's blog entry on Hugelkultur.


Happy hugelkultur habitat making.  See you tomorrow.

Tony

Dec 142012
 
A centipede on Tony’s patio.

Today is my second posting of rebuilding hugelkultur Food Ridge West — all animal habitats get a name!

Go to Hugelkultur to see a description of this European garden art.

Today’s video starts with pulling apart an old firewood pile and some critters found in that habitat.  One critter is relocated to the hugelkultur Food Ridge West.

Hugelkultur 2 of 4 (video):

From Tony’s project (pics):

A centipede on Tony’s patio.A centipede on Tony’s patio; pic taken during another project day.  Note the long tail antennae (bottom), how each body segment has one pair of legs (millipedes have 2 pairs of legs per body segment), and how shiny red the body is (a defensive “I look like venom” strategy).


Some images of hugelkultur.

For a detailed discussion,

clear graphics, and lots of pics of hugelkultur,

see Paul Weaton’s blog at:Click to go to Paul Weaton's blog entry on Hugelkultur.


Happy hugelkultur habitat making.  See you tomorrow.

Tony


Dec 142012
 

Hugelkultur is the piling up of organic matter, like wood stumps and prunings, to make a raised mound on which crops are grown.

Go to Hugelkultur to see more description of this European garden art.

Today’s video introduces Tony’s project — a hugelkultur on top of a previous hugelkultur.  The original pile of prunings and soil has decomposed and settled and is now ready for another round of rounds (pun intended!).

Hugelkultur 1 of 4 (video):

From Tony’s project (pics):

Last year’s yard debris pile converted to a hugelkultur. The yard debris pile that we have converted to a hugelkultur (by adding soil on top) stands nearly waste high to Anita.


Last year’s hugelkultur topped off with straw before final soil layer.Last year’s hugelkultur topped off with straw before final soil layer.  The hugelkultur was a good place to get rid of, “use”, some on-hand adobe soil.  Ultimately, the layers of organic matter below and above the adobe soil will enrich that soil.


Last year’s hugelkultur, Food Ridge West, produced a garlic crop.Last year’s hugelkultur, Food Ridge West, produced a garlic crop.  Notice how much the soil-covered debris pile has settled – the vertical log that was buried is now poking through the central walk path.


The BEFORE to this year’s Food Ridge West hugelkultur project.The BEFORE to this year’s Food Ridge West hugelkultur project.  The soil level has settled even more. The hugelkultur’s inner debris pile has broken down further – note the vertical log sticks out yet further than from last spring’s garlic crop pic, above.  Piles of black oak branches and limbs are ready to add to the hugelkultur.


For a detailed discussion,

clear graphics, and lots of pics of hugelkultur,

see Paul Weaton’s blog at:

Click to go to Paul Weaton's blog entry on Hugelkultur.


Some images of hugelkultur.


Happy hugelkultur habitat making.  See you tomorrow.

Tony

Dec 132012
 
Early morning sun on Hachiya persimmon leaves.

First a video re “Harvesting Persimmon 2 of 2”, then some pics of the project (below the video):

Harvesting Persimmon 2 of 2 (video):

From the project (pics):

The bounty of Hachiya persimmon from this year’s harvest.The bounty of Hachiya persimmon from this year’s harvest.  These picnic boxes and more!


Early morning sun on Hachiya persimmon leaves.Early morning sun on Hachiya persimmon leaves.  These leaves have changed color (fall foliage) from their usual lush greens and are about to drop.


Our young persimmon tree grows alongside an established pine tree.Our young persimmon tree grows alongside an established pine tree.  Someday, we will climb the pine to harvest persimmon.


Happy persimmon harvesting and drying.  See you tomorrow.

Tony

Dec 102012
 
Close-up of harvested Hachiya persimmons.

First a video re “Harvesting Persimmon 1 of 2”, then some pics of the project (below the video):

Harvesting Persimmon 1 of 2 (video):

From the project (pics):

Our neighbor’s Hachiya persimmon tree.Our neighbor’s Hachiya persimmon tree, with its lower branches picked clean.  What a treat to have fruit ripen so late in the year, on this December day.


Hachiya persimmon harvested on a frosty day.Hachiya persimmon harvested on a frosty day.  The green-before-turning  leaves take on beautiful colors before the fruit ripens and are easy to press – perhaps placemats for your dried persimmon treats!


Close-up of harvested Hachiya persimmons.Close-up of harvested Hachiya persimmons.  These almost ripe persimmons, with firm flesh, will soften to a near jelly state if left to ripen by a window.


Pic and caption from Tony’s new book, Habitat It and They will Come :

A red squirrel hangs upside down to feast on a ripe Hachiya persimmon.Appendix 1, Habitat Match: C) My sugary fruit makes a nice meal on cold winter days when cousin fruit trees are empty.


Happy persimmon harvesting and drying.  See you tomorrow.

Tony

Dec 072012
 
Watering with finer spout holes.

First a video re “Bucket Watering Can DIY 4 of 4”, then some pics of the project (below the video):

Bucket Watering Can DIY 4 of 4 (video):

From the project (pics):


New and Improved watering can (model 000000000000000002) has smaller holes.  New and Improved watering can (model 000000000000000002) has smaller holes.  A smaller spout stream helps distribute the water more evenly and is less harsh on bare soil and fragile seedlings.


A look inside the watering can ready for application.A look inside the watering can ready for application.  Note the floating food particles that would clog up the spout to an ordinary watering can.  THIS is no ordinary watering can!


Watering with finer spout holes.Watering with finer spout holes.   Mission accomplished – the new watering streams are less sloppy than the larger-holed watering can.


Happy DIY projects for your Habitat Food Forest.  See you tomorrow.

Tony

Dec 072012
 
Watering the garden with our new watering can.

First a video re “Bucket Watering Can DIY 3 of 4”, then some pics of the project (below the video):

Bucket Watering Can DIY 3 of 4 (video):

From the project (pics):

Filling the watering can with dishwater (blackwater).Filling the watering can with dishwater (blackwater).   Check out that water!  It’s a mix of soapy water, food particles from our dishes, and pasta drain-off water.  Here microbes, come and get it!


Diluting the dishwater with fresh water.Diluting the dishwater with fresh water.  We’ll get more coverage in the garden by adding fresh water to the nutrient “concentration”.


Watering the garden with our new watering can.Watering the garden with our new watering can.  Note the use of the fill hole as handle grip.  It works!  And, easy to clean.


Happy DIY projects for your Habitat Food Forest.  See you tomorrow.

Tony

Dec 072012
 
Cutting a fill hole in the bucket’s lid.

First a video re “Bucket Watering Can DIY 2of 4”, then some pics of the project (below the video):

Bucket Watering Can DIY 2 of 4 (video):

From the project (pics):

Cutting a fill hole in the bucket’s lid.Cutting a fill hole in the bucket’s lid.  The large hole allows filling the watering can easily AND can be used as a non-moving grip while watering garden.


Finding center opposite the watering can’s grip (the fill hole).Finding center opposite the watering can’s grip (the fill hole).  The bucket was then flipped 180 degrees to locate the center of the holes to be drilled.


Spout holes are drilled to both the right and left of the center mark hole.Spout holes are drilled to both the right and left of the center mark hole.  The more holes, the wider the watering row-of-streams will be.


Happy DIY projects for your Habitat Food Forest.  See you tomorrow.

Tony