Garden Log (what I did):
1. Installed posts for House Finch Hideaway.
You, the Habitat Gardener (reflections):
1. A beloved neighbor of mine has very little privacy in her back yard and wants more. Her yard slopes up from the back fence, so her back neighbors have a straight-shot view of her patio sliding door and into the house. What a drag to have to draw the curtains for privacy. But, I want to see the garden! Solution: Create privacy at the fence. Then, even the garden becomes private.

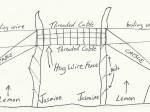
Original Plan for House Finch Hideaway
I love trellises. Vertical growing allows stacked vegetation (Ex. = plants on the ground and above) or “stacked functions” [a permaculture term] (Ex. = a clear walkway below and plants above). We will use a trellis to create Beloved Neighbor’s privacy and support for fruit vines. Grape, kiwi, fig, and espaliered lemon all do well growing along trellis wire. However, because our first goal is to create privacy, evergreen plants become our first choice. Of those fruiting vines just mentioned, only the lemon is evergreen. And one drawback to evergreen lemon trees is their relatively slow growth when compared to fruiting vines. Pink Jasmine to the rescue — a fast growing evergreen vine with very fragrant flowers. The jasmine will become a suspended thicket very welcoming to nesting birds and the fragrant flowers will attract bees and hummingbirds during the early spring bloom.

Back fence line before trellis installation of House Finch Hideaway.
My friend, Jim, an organic apple farmer, took me for a walk in the orchard last spring. He was excited to show me the perimeter fencing that he installed. Jim’s wire fence is a grape trellis, and a couple of thousand feet long. That’s a lot of grapes. He was particularly excited to show me how simple the hardware is. I was sold. Why just put up a fence when the same fence can support a crop? House Finch Hideaway is basically a vinyard fence a few more feet off the ground and not very long. The entire trellis will be 2 end posts with 2 center posts between them.

Left end post positioned in ground.
Yes!, I get to sink driftwood into the ground. I just happen to have a few good-sized driftwood poles left over from last year’s driftwood collecting. The four poles I’ll be using are all well over 10 feet long. They are long enough to secure 5-6 feet in the ground and still reach above the fenceline a few feet. My custom-made posthole digger tool (electric conduit fastened to digging clams) is long enough to do the job and save my back from breaking. And wala!, the first post, the Left end post, is in. I chose to sink that post first because placement next to the cherry tree is more critical than with other elements in the yard. The post was up-ended, in other words, the heavy trunk end was flipped up into the air and the thinner end of the pole was sent into the ground. Art! We want creatures in the garden and what better way to do that than to jog the imagination with tree trunks in the air.

Right center post waits patiently to be installed. Length = 15 feet.
The oddly angled posts present some challenges for this linear wire trellis. Sinking the driftwood posts for allignment of all four posts is part guesswork and part skill. I have worked with driftwood for a long time and can anticipate how pieces will lay, most of the time. Fortuneately for me, I did goof up here by the time I got to the center posts. But that’s part of my skill — to take advantage of goof ups. For instance, I THOUGHT I wanted the center posts perfectly vertical, like a respectable fence ought to be. BUT, I wasn’t thinking clearly and dug the center holes vertically. Well, duh, the two center posts are not straight. In the end, after some trial and error by my lowering them into both holes only to retreive them and switch their position, the posts told me where they belong. And what beautiful gracefulness they are in, with the strength of the trellis magnified by their self-directed position. Specifically, the center posts are also openning outward, as are the end posts, which will better stretch the fruit-laden wires of the trellis. There will be less sagging in the middle of the trellis because of the great tension created by the outward-facing posts. The wood talks!

Posts in holes left loose for wire tensioning.
All four posts have been left loose in their holes, in other words, soil has not been backfilled to secure their position. The posts might want to twist and turn a bit when the wire fenceline is tightened — no sense in counteracting that movement. Then, when the wire tension is appropriate, and the posts have fallen into resting position, the postholes will be backfilled with planting mix and vine starts. What happy plants they will be, with their roots sucking water from the hugh wood posts.
Installing earth anchors for the two end posts is next. Securing the end posts to the ground will help keep them from breaking under the heavy weight of the vines, fruit, wire and center posts.

Earth anchor with eye bolt end.

Earth anchor in shallow hole.

Measuring length of anchor rod before drilling.

A crowbar provides leverage for drilling in the earth anchor.

The earth anchor has been drilled into the ground "this far".

Adobe clay used to "cement in" the buried anchor.

Clay soil soaked to maximize settling.

Grape vine cuttings planted with Left earth anchor. Note the highly visible yellow cord to warn passersby.
I don’t want to lose sight of how deep the anchors are so I use a crude stick measurement for the before and after depth of the anchors. A crowbar in the anchor’s eye helps drill the other end’s screw into the soil. Well, that anchor is pretty far down there but I will fill in the hole with heavy adobe clay to increase the weight on the anchor — would be a drag if the vine and fruit loaded trellis and poles were to heave out the anchor some day. Keeping the adobe soaked in the hole will help it pack and maximize it’s volume and weight as it settles.
With both earth anchors in place, now it’s time to wire the end posts to the anchors. 13 gauge galvanized vinyard wire will be secured by Gripple fasteners; see www.gripple.com for how Gripple’s line of agricultural hardware is used.
The endposts are secured with wires angling down to the ground at 45 degrees (90 degrees to the slanting posts). Yet to be done, the horizontal fruit-/vine-bearing wires will be strung between all four posts.

Right end post wired to earth anchor.
Today I got as far as wiring in the end posts. The horizontal wires will come another day. Stay posted, pun intended.

House Finch Hideaway's four posts awaiting connecting wire.
Tony