First a video re “Harvesting Persimmon 1 of 2”, then some pics of the project (below the video):
Harvesting Persimmon 1 of 2 (video):
From the project (pics):
Our neighbor’s Hachiya persimmon tree, with its lower branches picked clean. What a treat to have fruit ripen so late in the year, on this December day.
Hachiya persimmon harvested on a frosty day. The green-before-turning leaves take on beautiful colors before the fruit ripens and are easy to press – perhaps placemats for your dried persimmon treats!
Close-up of harvested Hachiya persimmons. These almost ripe persimmons, with firm flesh, will soften to a near jelly state if left to ripen by a window.
First a video re “Bucket Watering Can DIY 4 of 4”, then some pics of the project (below the video):
Bucket Watering Can DIY 4 of 4 (video):
From the project (pics):
New and Improved watering can (model 000000000000000002) has smaller holes. A smaller spout stream helps distribute the water more evenly and is less harsh on bare soil and fragile seedlings.
A look inside the watering can ready for application. Note the floating food particles that would clog up the spout to an ordinary watering can. THIS is no ordinary watering can!
Watering with finer spout holes. Mission accomplished – the new watering streams are less sloppy than the larger-holed watering can.
Happy DIY projects for your Habitat Food Forest. See you tomorrow.
First a video re “Bucket Watering Can DIY 3 of 4”, then some pics of the project (below the video):
Bucket Watering Can DIY 3 of 4 (video):
From the project (pics):
Filling the watering can with dishwater (blackwater). Check out that water! It’s a mix of soapy water, food particles from our dishes, and pasta drain-off water. Here microbes, come and get it!
Diluting the dishwater with fresh water. We’ll get more coverage in the garden by adding fresh water to the nutrient “concentration”.
Watering the garden with our new watering can. Note the use of the fill hole as handle grip. It works! And, easy to clean.
Happy DIY projects for your Habitat Food Forest. See you tomorrow.
First a video re “Bucket Watering Can DIY 2of 4”, then some pics of the project (below the video):
Bucket Watering Can DIY 2 of 4 (video):
From the project (pics):
Cutting a fill hole in the bucket’s lid. The large hole allows filling the watering can easily AND can be used as a non-moving grip while watering garden.
Finding center opposite the watering can’s grip (the fill hole). The bucket was then flipped 180 degrees to locate the center of the holes to be drilled.
Spout holes are drilled to both the right and left of the center mark hole. The more holes, the wider the watering row-of-streams will be.
Happy DIY projects for your Habitat Food Forest. See you tomorrow.
First a video re “Planting Salvia spathacea next to Monica Manzanita Mannequin 2 of 2”, then some pics of “Monica Manzanita Mannequin animal habitat installation” (below the video):
Planting Salvia spathacea next to Monica Manzanita Mannequin 2 of 2 (video):
Monica Manzanita Mannequin animal habitat installation and planting Salvia spathacea (pics):
The west end of Cacti Caverns is cleared of lavarock. The “Monica” (species name) manzanita (Spanish for “little apple”) shrub will be planted on top of Cacti Caverns’ terra cotta flat roofing tiles.
The lower tile is slide under the top tile to make room for Monica Manzanita Mannequin animal habitat. Poor quality soil (high percentage of adobe clay) is removed to make room for planting (better quality) soil.
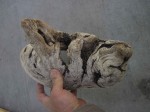
Tony’s last conversation with Monica Mannequin. Note the wavy wood grain, identifying the mass as a tree root burl. The “nose”, or upright projection (Hey, work with me here!), is the base of the trunk, which starts out a straight grain.
Monica Manzanita threaded through Mannequin. Soon critters will inhabit the inside vaulted ceilings and come and go through Mannequin’s crevices. A pole planted next to MMM serves as a handhold while traversing the walk path.
Monica manzanita a month after being planted. Looks happy to me! Not over watering is probably the biggest challenge this manzanita shrub will offer here in California, where it is a native plant.
After two healthy months, the typically very slowly growing shrub looks to be establishing itself. Grape Overpass is sporting bunches of green grapes that will ripen in a couple of months.
Hummingbird sage (Salvia spathacea) planted next to Monica Manzanita Mannequin habitat. The salvia, like the manzanita, is also a native plant that will thrive in the dry hydrozone garden bed.
Both hummingbird sage (Salvia spathacea) pose for a photo op next to Monica Manzanita Mannequin habitat. The critters will be happy!, especially in years to come when the manzanita tree canopies its undergrowth of hummingbird sage.
Happy animal habitat installations. See you tomorrow.
First a video re “Planting Salvia spathacea next to Monica Manzanita Mannequin 1 of 2”, then some pics of “Cacti Caverns animal habitat installation” (below the video):
Planting Salvia spathacea next to Monica Manzanita Mannequin 1 of 2 (video):
Cacti Caverns animal habitat installation and Planting Salvia spathacea (pics):
Roof view of driveway property line in 2010: From street, 1) sunflowers are growing in Canyon Wall Oasis (large cavity in ground), AND 2) cacti grow above Cacti Caverns. Note that the lavarock continues past Cacti Caverns to THE WORLD (especially if you are a tiny critter!).
Close-up of Cacti Caverns in 2010. Low profile above ground. Several small sheltered cavities below ground. Note the applewood tunnel in foreground and the 3-stack thick curved clay roofing tile tunnel in rear. All earthworks are critter approved!
On with the show! Let’s get this Hummingbird sage (Salvia spathacea) planted and shoot some film.
The two hummingbird sage will be planted between Cacti Caverns habitat and Monica Manzanita Mannequin habitat. Truth be told, the salvias are actually planted above one of Cacti Caverns buried roofing tile cavities.
Pics and captions from Tony’s new book, Habitat It and They will Come of Cacti Caverns animal habitat installation (pics):
Figure 4.52 Property line before Cacti Caverns installed. Zeroscape for miles and miles and miles. Time to change that. Cacti Caverns will provide a little greenery, a little nook and cranny, a little Life is what you make it! to this property line.
Figure 4.60 Planks held in place by rebar. The sturdy barricade will keep the rock in place during work. A worthwhile effort. Cascading creative ideas and manipulation of the moonscape into Cacti Caverns wonderland won’t have to be interrupted to replace rock landslides.
Figure 4.72 Flat Clay Roofing Tiles resting on tunnel. Gaps on both sides of the rounded log section will shelter (fill in critters of your choice) . Note shovelful of soil used to anchor tile in place; the soil will be washed down to settle both sides of the tile. Lavastone will rest directly on the tile’s flat surface.
Figure 4.94 Three Years Later. next pages Cacti Caverns has matured. The cacti have grown paddle upon paddle upon paddle, a delicate flowering ivy has spread throughout, and Sea Creature has silvered (aged gracefully, they say). Wood destined for the garden (in background, out of focus) awaits its turn alongside Cacti Gardens. A wary garter snake has crawled out of the thicket of ivy and cacti, and rests on the fencepost. Even more exciting than the snake itself (in our garden!) was watching it retreat from my pestering photography down into the ivy-obscured entrance of the applewood tunnel.
Happy animal habitat installation. See you tomorrow.
Skyward Pumpkin harvested, taken down from its altar in the crosshatch of bamboo teepee trellis poles. Note the forced out-of-round shape; almost hurts to look at! Also notice the cozy spider web in the cracked-open vine. A red-backed Thompson’s jumper is tucked away, hoping we will GO AWAY!
Millipede in Skyward Pumpkin vine. So much for hiding – this millipede was very concealed in the pumpkin vine till I split the vine open to look for critters. Judging from the mess in its room, I would guess this is an adolescent millipede 🙂 . Note the hollow structure of the vine that invited the millipede in; I have cracked the vine in two, spreading the halves open like a book.
Skyward Millipede on the move, all kazillion legs. Note the millipede’s segmented antennae and how each body segment has 2 legs on each side of the body. Watch out, millipede, you're headed for Skyward Pumpkin’s butt crack!
Skyward Millipede further on down the road. How graceful!
Figure 4.194Right Side Up. Some of this millipede’s characteristics include: doesn’t bite (but does release a cyanide-based fluid that STINKS!), mostly a scavenger of organic debris, short antennae, slow crawler, legs are tucked under the body. Most of those characteristics are in contrast with a centipede’s: centipedes are fast, long-antennaed, predatory, and pack a mean bite. Figure 4.195 Up Side Down. Same millipede, probably more annoyed at this point.
Happy planting garlic, onions, and shallots and see you tomorrow.
First a video re “Salamander Castle’s Ant Colony”, then some pics of Crossroads Compost (below the video):
Garden Tour (Salamander Castle’s Ant Colony) (video):
Crossroads Compost, a brief history (pics):
January, 2008. Crossroads Compost was yet to be born, but the straw bale at the back of the yard, next to the fence, was the seed waiting to be planted. That bale was allowed to age there, providing habitat for soil critters and enriching the soil as it broke down.
May 2008. By now, we are storing straw next to the back fence (but not touching it) at the junction of our garden paths. There is a bale left intact as a seat, habitat, and future source of old straw. Other bales are pulled apart to create a mat over weeds we wanted to eliminate. Note how low ground level is and how young the plants are: currant (foreground), fig (left, supported by hoops), and the pineapple quava (back right).
May 2010. The ground level is still fairly low; I have not started to stockpile wood chips in Crossroad Compost yet. The currant is larger and sporting green fruit. Fig and grape vine hover on Kiwi Gondola trellis.
April 2011. Salamander Castle moved to back garden. This lucky oak stump was rescued from our nearby bike path, where the massive tree came down. Work crews cut the tree away from the path and left Salamander Castle off to the side, not knowing that its destiny was to become an animal habitat. Note the beginning of the wood chip pile covering the Crossroads, soon to be buried with other chips 3 feet deep – that’s a whole lotta nutrients and moisture for the fig, grape, kiwi, currant, blueberry, pineapple guava, apricot, lemon to enjoy. Salamander Castle was moved next to the currant stand and wood chips were piled against it.
Happy dusting ants off yourself (from disturbing their nest) and see you tomorrow.
First a video re “Garden Tour (Earthworms in Bog)”, then some pics of earthworms from our Earthworm Bin (below the video):
Garden Tour (Earthworms in Bog) (video):
Earthworms from our Earthworm Bin (pics):
Earthworm bin harvest, rich with red wiggler worms, is added to a planting bed.
Earthworm Bin tucked away in the protective shade of a tree. Note the brick on top to prevent animals from feasting in the box. Evening primrose flower above; calendula flower below.
Figure 4.143 Earthworm Bin Harvest. Worm bin harvest layer over planting mix. The worms and microbes will continue to feed on the organic matter like the eggshell and rhubarb stalk section shown. And when all those microbe and crawly critters take a break from eating, they might just breed, or die. The planting bed has been inoculated with Life — life that translates to nutritious and well-aerated soil for the kiwi vines.
Figure 4.190 With A Little Help From My Friends. Earthworm bin harvest to be placed at the crown of the tree. These red wiggler worms, a typical compost pile worm, may not stay in the tree mound and surrounding soil on a long-term basis but they will enrich and aerate the soil till they do leave.
Lemon Pot planted with pac choi. This is the patio pot that I planted the hugelkultur, a thick layer of weeds and greens, just above the drainage gravel.
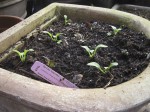
Carrot seedlings in a large patio pot.
Scarlet runner beans continue to ripen on the kitchen windowsill. These beans were harvested on day 1 (6 days ago) and seem to be ripening (browning) well.
Happy planting veggies on your patio and see you tomorrow (Happy Thanksgiving!).
 Our neighbor’s Hachiya persimmon tree, with its lower branches picked clean. What a treat to have fruit ripen so late in the year, on this December day.
 Hachiya persimmon harvested on a frosty day. The green-before-turning leaves take on beautiful colors before the fruit ripens and are easy to press – perhaps placemats for your dried persimmon treats!
 Close-up of harvested Hachiya persimmons. These almost ripe persimmons, with firm flesh, will soften to a near jelly state if left to ripen by a window.
 Appendix 1, Habitat Match: C) My sugary fruit makes a nice meal on cold winter days when cousin fruit trees are empty.
 has smaller holes.")


.")


.")


 planted next to Monica Manzanita Mannequin habitat.")
 next to Monica Manzanita Mannequin habitat.")

.")

 shows off Tony and his camera gear before being planted.")


.")
.")