Lemon Pot planted with pac choi. This is the patio pot that I planted the hugelkultur, a thick layer of weeds and greens, just above the drainage gravel.
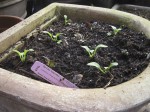
Carrot seedlings in a large patio pot.
Scarlet runner beans continue to ripen on the kitchen windowsill. These beans were harvested on day 1 (6 days ago) and seem to be ripening (browning) well.
Happy planting veggies on your patio and see you tomorrow (Happy Thanksgiving!).
Day6 in this 6-day video series: Preparing patio pots for winter veggie planting.
First a video re “Leaf Layer Added to Leaf Trench Highway”, then some animal habitat pics (below the video):
Patio Veggie Pots 6 of 6 (video):
Leaf Layer Added to Leaf Trench Highway (pics):
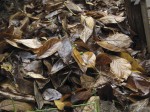
Leaf Trench Highway with a fresh layer of tulip magnolia leaves. The trench along the walkway is three feet deep and filled with different organic/yard debris layers. The layers will break down and form rich compost in about 6 months to a year.
Leaf Trench Highway extends along the back corner of our yard to Salamander Resort (left). Besides storing organic material (twigs, leaves, straw, manure, pulled weeds), the trench also feeds the fedge (food hedge) along our property line. Pineapple guava, fig, and pomegranate trees, as well as annual veggies, grow in the compost-making veggie bed.
Critter level, perhaps the head height of a raccoon, skunk, or possum, of the entrance to Leaf Trench Highway. Personally, if I were a salamander, I would crawl under the leaf litter. Lots of tiny tidbit treats (FOOD!) under those moist leaves.
Dishwater ready for the compost pile. Dishwater with soap and food (left bucket) is considered “blackwater”; rinse water is considered “greywater”. We pour blackwater directly into the compost where microbes and micro-critters will process it. The greywater rinse water makes a fine treat for most of the garden, with care not to pour it directly on fruit/vegetables.
Happy planting veggies on your patio and see you tomorrow (Happy Thanksgiving!).
Day 5 in this 6-day video series: Preparing patio pots for winter veggie planting.
First a video re “Patio Veggie Pots”, then some animal habitat pics (below the video):
Patio Veggie Pots 5 of 6 (video):
Soil Making in Leaf Trench Highway (pics):
Horse manure ages in leaf Trench Highway, on top of many layers of garden debris organics.
Mushrooms pop out of Leaf Trench Highway’s manure after the first rain. Good stuff! Having the fungi/mushrooms means the manure will break down faster.
Later that year, Tony harvests compost/rich soil from the trench.
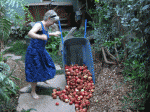
Anita dumps a new load of soil critter food. These apples were “debris” for a neighbor that wanted under her tree “cleaned up”. The soil critters and we are sure happy to have the mess!
A short retaining wall is added to Leaf Trench Highway. The short wall of re-used fence boards will allow a higher pile of organics to be heaped into Leaf Trench Highway, yet keep the walkway clear. Note how the block keeps the sledge from splitting the dry fence board.
Leaf Trench Highway’s short retaining wall in place, holding back tulip magnolia prunings (limbs and twigs). Lichens, mosses, and algae so abundant! Does life get any better?!
Figure 2.11 White Clover and Leaf Trench Highway. Leaf Trench Highway is about making soil — the 3 foot deep trench is filled with green mulch (for example, a whole lot of pumpkin vine prunings), then covered over with old (cool) manure and compost. Potato starts are dug in. Harvest, 6-9 months later, yields full-grown potatoes PLUS a long, deep trench of beautiful soil to use elsewhere in the garden. The white clover attracts pollinating insects to the potato flowers, adds nitrogen to green mulching, and is a sheltering go-between for critters to travel from one garden bed to another. Laying the slate pavers on soil, and not on sand or cement, allows soil fungi, microbes, and larger animals to pass through the soil, thereby assisting the growth of the clover cover crop.
Figure 3.37 The After of Salamander Resort. One year later and the resort is still operating. Driftwood creatures, a thriving beet crop, and Salamander Sunny Swimhole hide the goings-on eight feet below. See Figure 3.36 for “The Before”. Watering the pond waters the beets waters the compost waters the wood chips waters the oak rounds waters tank cavities waters Salamander Shady Shallows, AND waters the adobe clay earth surrounding Salamander Resort. Water + Cavities + Microbes + Mollusks (slugs and snails) + Worms + Insects = Happy Salamanders. The half wine barrel pond, with a 5’ x 5’ sheet of pond liner, was home this spring to Pacific Tree Frogs (and tadpoles). Many types of insect on the wing visit the pond. A salamander must be living somewhere in all that! Note some habitat features: clover on the slate path links this habitat to the rest of the garden, the pond’s surface rocks provide a critter rest stop, the “fedge” (food hedge of fig, pineapple guava, loquat, and pomegranate) along the fence provides flowers and food, and the compost in Leaf Trench Highway at the base of the fedge attracts its own ecosystem of soil makings and critters.
Happy planting veggies on your patio and see you tomorrow.
Day 3 in this 6-day video series: Preparing patio pots for winter veggie planting.
First a video re “Patio Veggie Pots”, then some patio veggie planting pics (below the video):
Patio Veggie Pots 3 of 6 (video):
Patio Veggie Planting (pics):
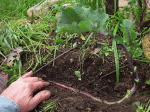
Lemon Pot with a thick layer of "garden debris" (if there is such a thing!) under the planting soil. The composting organics will eventually turn to soil and add some richness to the existing soil. The process of burying organic matter in piles to breakdown over years is called hugelkultur, a German term and garden art.
For a detailed discussion,
clear graphics, and lots of pics of hugelkultur,
Click image to go to http://www.richsoil.com/hugelkultur/
see Paul Weaton’s blog at:
Happy planting veggies on your patio and see you tomorrow.
Day 4 in this 3-day series of videos (BONUS video!!!) depicting amaranth seed collecting. Today’s video is a field trip to Food For Thought, the Sonoma County Aids Food Bank, in Forestville, California.
First a video re “Amaranth Plants at Food For Thought”, then some amaranth pics (below the video):
Amaranth Plants at Food For Thought:
Amaranth in Food For Thought’s Garden (pics):
Amaranth (red and green) along a fence. 8 feet high!
Close-up view of red and green amaranth varieties. Swayin’ in the wind, waiting for harvest.
Elephant head amaranth (Amaranthus gangeticus). This species grows 2-3 feet.
Close-up of elephant head amaranth in the Food For Thought garden.
Massive red amaranth with green stalk leans over. A shrub! Note the stalk's ridges which give it girder-like support. Also note the small offshoots that display the red flowers.
Amaranth with golden stalk and flowers.
Relaxing, restoring, rejoicing with amaranth, sunflower, and garden love.
Food For Thought, Sonoma County Aids Food Bank, Forestville, California. Food bank for the community, with a lush food-rich and critter-happy garden. http://fftfoodbank.org/
You have landed on Day 1 in this 3-day series of videos depicting amaranth seed collecting. Enjoy!
First a video re “Amaranth Seed Collecting”. Today’s video is part 1 of 3 (1/day) for the series! THEN some amaranth pics (below the video):
Amaranth Seed Collecting 1 of 3 videos
Amaranth in Tony’s Garden (pics):
Amaranth plant (Amaranthus sp. L.) can grow to 8 feet tall. A stunning plant in the garden, adding color and critter habitat AND a food source for the gardener.
Collecting seed AND giving insects/spiders time to escape.
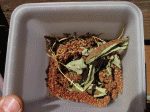
Collected and dried amaranth seed with dried flowers and leaves. The seeds are yet to be separated out of the dried plant.
You have landed on Day 4 in this 5-day series of videos depicting propagation of tree collard cuttings. Enjoy!
First a video re “Collard Propagation”. Today’s video is part 4 of 5 (1/day) for the series! THEN some tree collard pics (below the video):
Tree Collard Propagation — 4 of 5 videos
Mulching Collard Cuttings (pics):
Dragon Spine Ridge planted with tree collard. The cuttings are mulched with straw, comfrey leaves, and collard leaves.
Close-up of tree collard cuttings mulched with straw, comfrey leaves, and collard leaves. The collard cuttings are left behind to share the wealth with slugs and snails looking for food -- but please leave our new transplants alone for now. Note the cut back comfrey plant to the left; its leaves are used to mulch around the new collard starts. Cutting back the comfrey releases nitrogen to the soil via the die-back roots AND through the decomposing leaves themselves.
Mulch surrounding tree collard cuttings. Note the chop-and-drop'ed dock plant to the right -- all its leaves were used to mulch with or add to the compost for soil making. The leaves were yanked but the plant is expected to grow back, over, and over, again.
Comfrey leaves guarding tree collard cutting. The tree collard cutting (center of leaves) has taken a beating by some night marauders, probably slugs and/or snails. Perhaps the hairy underneath of the comfrey leaves will deter critters long enough for the cutting to catch up and thrive.
You have landed on Day 5 in this 5-day series of videos depicting propagation of tree collard cuttings. Enjoy!
First a video re “Collard Propagation”. Today’s video is part 5 of 5 (1/day) for the series! THEN some tree collard pics (below the video):
Tree Collard Propagation — 5 of 5 videos
Young Tree Collard Starts (pics):
Tree Collard cuttings/starts after 2 month's growth, left pot only. Healthy!
Close-up of tree collard cuttings 2 months old. Lots of growth.
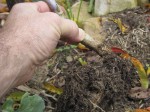
2 month old tree collard cutting growing on Dragon Spine Ridge. The specimen of focus here is the collard plant on the right. I pulled it up to inspect the root growth (to show YOU!), dug the roots back into the soil, and pruned off its top. Pruning off the top was advised (by me) because the inspection most likely destroyed some root mass. Less root mass, THEN less foliage will be supported. I also wanted to top off the young plant to encourage it to branch out lower rather than higher. See the next two pics.
2-month old roots of the young tree collard start. Good healthy soil, good healthy root growth. A good day!
Young Tree Collard is back on its feet, a rock to help it hunker into the ground after my rude root inspection.
You have landed on Day 3 in this 5-day series of videos depicting propagation of tree collard cuttings. Enjoy!
First a video re “Collard Propagation”. Today’s video is part 3 of 5 (1/day) for the series! THEN some collard tree pics (below the video):
Tree Collard Propagation — 3 of 5 videos
Transplanting Tree Collard Cuttings for Propagation (pics):
Transplanting tree collard cutting - 1 of 4. Note the bend in the cutting. Could be very difficult to stab this cutting into the ground and keep the leaves off the soil-mulch surface. But working with what we have, we'll lie the cutting on its side. The extra length of cutting (not pruning it back because of the bend) will allow more root development and better ensure propagation.
Transplanting tree collard cutting 2 of 4. Perfect fit for this tree collard cutting that has two 90-degree bends in it. Permaculture principle #1 = the problem is the solution. Because of its twists and turns, this cutting has primo real estate in the topsoil layer – look at how well the cutting, or new root system travels horizontally, along the rich microbe-abundant topsoil layer.
Transplanting tree collard cutting - 3 of 4. The topsoil layer is returned over the cutting. Leave it as you found it. The soil microbes have had a heck of a day (I hate moving!), but they will get a second chance at thriving, alongside the transplanted tree collard cutting. The green manure (boring people call them “weeds”) are also pushed back into place with the lightly packed topsoil. Those plants/greens are going to be mulched over (next pic) so they will boost the existing community of soil microbes. And the soil microbes and the tree collard cutting’s new roots will live happily ever after.
Transplanting tree collard cutting - 4 of 4. Rice straw (old, perhaps last year's bale) is used to mulch over the tree collard cutting. Moisture retention is critical while the cutting decides to thrive or not. Note the chop-and-drop'ed dock plant (lower right); see text below re chop-and-drop.
Note the chop-and-drop’ed dock plant in the above pic (lower right). Sure it could have been ripped out while I was digging in the transplant. BUT, I would rather have the dock plant’s large, voluptuous leaves soak in the sun’s rays, create carbon (sugars) and other organic matter in the form of more leaves and a more developed root system. THEN, I will come along again (for the umpteenth time!) and demand that the plant start all over. Besides perhaps emotionally scarring Dock, the leaves I’ve collected can be used to make mulch, compost, or salad. The root system that was supporting all that leaf growth dies back; the leaves are no longer feeding it. Those died-back roots then become food for the soil as well as organic material that retains moisture for the new roots to come as the dock plant regrows.
You have landed on Day 2 in this 5-day series of videos depicting propagation of tree collard cuttings. Enjoy!
First a video re “Collard Propagation”. Today’s video is part 2 of 5 (1/day) for the series! THEN some collard tree pics (below the video):
Tree Collard Propagation — 2 of 5 videos
Preparing Tree Collard Cuttings for Propagation (pics):
Collard Tree prunings, ready to trim the leaves from the stems for a meal. The remaining stems will be used as propagation cuttings.
Preparing Collards for the kitchen and for propagation. When given the chance, work outdoors. Good vitamin J (joy)!
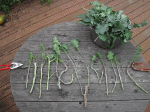
Preparing Collards for the kitchen and for propagation. The edible leaves have been stripped off of the harder/woodier stems. For illustrative purposes, I arranged the stems on the table to show you how far each stem is pushed into the soil. The line between pruners and sheath represents ground level. Note how little leaf bulk is left on the stalk; root development is the priority.
Soaking tree collard cuttings for tomorrow's transplant. We recently had a good rain. Plenty of nutrition in that funky water. The bucket was left outdoors to collect water; leaves were a bonus.


.")
 entrance to Leaf Trench Highway.")


 along a fence.")

.")


")


.")