May 142013
 
Sambucas mexicana in Elderberry Pond wildlife habitat.

I posted my monthly blog article (due every 14th of the month) at Native Plants and Wildlife Gardens:


Sambucas mexicana in Elderberry Pond wildlife habitat.

Sambucas mexicana in Elderberry Pond wildlife habitat. Perhaps the cutting shrub propagation will be successful. The young shoots look promising.


Enjoy your wildlife garden.  Habitat It!

Tony

Apr 142013
 
20130413 Citrus Caterpillar Corner

20130413 Citrus Caterpillar Corner

The habitat installation, Citrus Caterpillar Corner, has been in a few days now.  Today’s upgrade is to re-unite the oak spire with its bark that was left behind on the driveway.  The massive oak limb section has provided habitat for critters on our driveway for a few years; most of the bark fell away from the hardwood.  Moving the loose bark to Citrus Caterpillar Corner and creating a small debris pile with it there will strengthen Citrus Caterpillar Corner as an animal habitat.


See the complete write-up of this habitat installation at: http://nativeplantwildlifegarden.com/20130414-citrus-caterpillar-corner/ .

Feb 232013
 
Food Ridge West before final layer of garden mix.

It’s now Friday, so my back and body in general are nearly recovered.  On Monday this week, I spent the whole day shovelling manure and compost on top of Food Ridge West, our raised veggie bed and animal habitat.  Veggie bed — because the debris pile covered with manure/compost/gardening soil will be plantable this late spring.  Below are three videos of this week’s progress with the hugelkultur Food Ridge West.  Enjoy!


20130218 Food Ridge West Hugelkulture 1 of 3

Food Ridge West Hugelkulture now has a layer of pine tree limbs in the center of the better, more growth-supportive wood debris pile.  Horse manure will be used to “burn” the pine and help it become a good veggie bed resource faster.


20130218 Food Ridge West Hugelkulture 2 of 3

Eleven yards of manure/compost are now on the hugelkultur.  The compost corral is empty, almost — the rest will go to another site.  Now, we are ready to give the hugelkultur a new hairdo.

20130218 Food Ridge West Hugelkulture 3 of 3

Cousin It has been hangin’ out at the hugelkultur!  The compost/manure pile is on the hugelkultur!  A bale of rice straw has been scattered over the compost to avoid erosion from the coming rains.


Food Ridge West before final layer of garden mix.Food Ridge West before final layer of garden mix.  The shredded rice straw bale is used to reduce the soil’s erosion from the coming rains.  The final layer, of organic garden mix, will be added in a couple of weeks and by then the compost/manure under-layer will have settled some.

Happy habitat creations and don’t forget to sniff the daffy’s.

Tony

Feb 172013
 
Multi-graft apple tree.

Multi-graft apple tree.
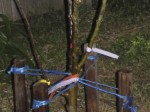
Multi-graft apple tree.  Note the 5 different tags on the tree: 1) Multi-Graft, with code for root stock; 2) Gravenstein Apple, 3) Red Delicious Apple, 4) Yellow Delicious Apple, 5) Granny Smith Apple.  Keeping the tags on, at least till the fruit is well identified, helps to sort out which apples are which.


Today was a beautiful day in sunny California, with a warm afternoon reaching 65 degrees.  Good napping in the car at work weather.  And, also good weather for planting bare root fruit trees before warmer weather stimulates the dormant trees.

Bare root trees are trees that have been pulled out of their growing soil/sand medium with most of their roots clean of soil, and no leaves or even buds.  These trees look like not more than a few sticks off a main, thicker stick (the trunk) with a straggly mop of roots.  Having planted a bare root tree previously to see it thrive and leaf out helps one to appreciate their dormant abundant life waiting for your garden.

My friend, Mark, recently lost his Papa.  Mark’s Papa, Louis, died January 27th this year and Mark decided to remember him by planting a tree in his honor.  I was lucky enough, and honored, to be part of Mark’s tribute to his Dad.  So we planted a bare root multi-graft upright (not for espalier) apple tree in Mark’s back yard this afternoon.

Simple task to plant a bare root fruit tree.  Dig a hole and put the tree in, right?  Well almost.  Our job today was not so simple.  Luckily, it was also not so hard.  In the end, Louis got just the right amount of work out of us, and Mark and I got to clean up and have sunset to ourselves.

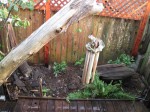
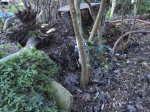
The first challenge was to plant this apple tree so that its feet would not be wet, that is, so that it received good drainage and its roots were not sitting in water.  The planting spot just happens to be the lowest part of the back yard, to the side of a large water-run-off paver patio.  Sitting water was under the plywood sheet we cleared out of the way to start the tree’s hole.   The soil is the famous adobe clay of the area BUT I was pleasantly pleased that Mark had enriched it well over some years.  The tree will be very happy in the spot Mark choose for it but let’s get it up out of the water!

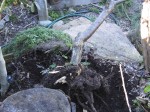
Aha!  Not only is the soil adobe heavy, there’s a plastic sheeting under this part of the yard.  What a pain!  What a blessing!  Better to find a problem now (that can be fixed) than to have one later with no solution in sight.  As we dug out the outer trench for the tree, we cut the plastic liner.  Wala! (tried the old pull-out-the-tablecloth trick but it didn’t work) and a mess of soil later, and we could now plant the tree.

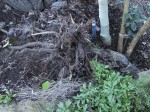
Four stakes were driven into the soil to center the tree.  A Norwegian Tree Box1 was created to raise the soil level by placing thin scraps of wood, two parallel in one direction, then two on top and parallel in the other direction.  The slat wood will hold up the soil till it settles, yet allow roots to escape, adventure, and fully support the tree. 

Slat wood used to raise the soil level.
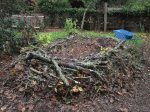
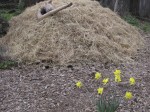
Slat wood used to raise the soil level.  A little help, buying time, till the steeply mounded soil settles in place.  The wood will quickly rot, returning to the Earth wence it came.


A root-spreading rock was placed on top of the soil mound and the tree’s roots were spread over the rock.  The roots were then covered with soil and mounded to the correct crown/trunk level.  Mulch was spread to enrich the soil, retain moisture, provide microbe and critter habitat, and to protect the new soil mound from the coming rains.  The tree is planted! 

Mark (right), tree (left).Mark proudly stands by the multi-graft apple tree, his tribute to his Papa.  “Look Dad, there will be blossoms on your birthday!”


A few instructions to Mark, one of which is to bulk up the mound a little; the height is good but the roots could use a little more soil to expand into.  On top of that “more soil”, some wood chips to mulch around the tree and to encourage mycorrhizal root growth.  And beyond the mound perimeter, maintain a watering trench which can also be filled with mulching material.  Especially for the dry months, no sense in having precious water pour off the mound and away from the tree.  Permaculture’s water mantra: Slow it, Spread it, Sink it!

The author and fellow tree hugger.


Take care, Louis.  Glad I was there.

Tony

1 There is no such thing as a Norwegian Tree Box, but I thought it sounded very woodsman-like at the time.


Feb 162013
 

Yesterday, Valentine’s Day, was the start of  new layers to our animal habitat/veggie bed hugelkultur, Food Ridge West.  The new layers are pine tree prunings, horse manure, and organic vineyard compost and can be seen in my post  Happy Valentines Day AND Garden What You Love

Final touches to the pine limb layer are shown in this video:


A straw bale holding bin was constructed on our driveway to stockpile soil-making material till moving them to the hugelkultur.  Also, the rectangle box, or “corral”, would be a good place for the compost company to dump the ordered organic vineyard compost.

Soil corral reinforced with cardboard corner.Soil corral reinforced with cardboard corner.  The cardboard gives structure to the straw housing and prevents leakage between the bales.  The rough concrete driveway is lined with a cardboard floor and folded up the sides of the bales.  Easier cleanup of the concrete and less leakage of the corral’s contents.  The manure and compost impregnated cardboard will be composted, perhaps thrown in the bottom of another hugelkultur after we clean up this project.

A couple of pickup truck bed loads of manure were used to line the bottom of the corral so that the vineyard compost could be dumped on top.  Shoveling out the pile into wheelbarrow loads then mixed the two soil additives to be dumped onto the hugelkultur.

Early stage of manure and compost bin.Early stage of manure and compost bin.  The bin was expanded with more bales, and a second tier of bales was added, to fit the incoming vineyard compost mix.

And here comes the dump truck!


Have a happy hugelkultur habitat day!

Tony

Feb 082013
 
Side view of Grandpa’s Apricot Root Worlds Fair animal habitat.

This is the third of three videos showing a garden animal habitat created when our apricot tree was almost entirely uprooted and partially buried on it side.  Features of the completed project are explained:
–The up-ended rootball serves as an animal habitat.
–The buried tree trunk acts as a retaining wall for the wood chip path.
–The retaining wall allows a watering trench to be dug into the garden bed slope.


20130130 Grandpa’s Apricot Root Worlds Fair 3 of 3 (video):

20130130 Grandpa’s Apricot Root Worlds Fair (pics):

Grandpa’s apricot tree is snug in the ground.Grandpa’s apricot tree is snug in the ground, upside down between the slate wall and the pineapple guava tree.  Note the also up-ended apricot tree rootball, which remains partially buried.  Some of the roots may thrive and send life to shoots reaching for the sky (like a tree!).


Woodchips are scooped aside to create a watering trench for the garden bed trees.Woodchips are scooped aside to create a watering trench for the garden bed trees.   The pineapple guava is tan-colored and the mission fig (thicker, in back) is a pale green.  The buried tree trunk serves as retaining wall to the left, allowing a deeper watering trench to be dug.


Side view of Grandpa’s Apricot Root Worlds Fair animal habitat.Side view of Grandpa’s Apricot Root Worlds Fair animal habitat.  Note the mix of Medusa-like roots and soil in the up-ended rootball.  The mass of roots and crown wood will become homes for wood-loving critters.  As well, the fingers of soil converging into the root mass will become homes for soil-loving critters.  In the end, ALL ARE WELCOME!!!


Enjoy your habitat upside down creations!

Tony

Feb 072013
 
The apricot tree is resting off to the side (left).

This is the second of three videos showing a garden animal habitat created when our apricot tree was almost entirely uprooted and partially buried on it side.  Highlights:

–Preparing the trench (hole) to receive the tree trunk and crown.

–Pruning the tree to live peacefully in the garden path.

–Stamping the tree into position before it is buried under the garden path.


20130130 Grandpa’s Apricot Root Worlds Fair 2 of 3

 (video):

20130130 Grandpa’s Apricot Root Worlds Fair (pic):

The apricot tree is resting off to the side (left).The apricot tree is resting off to the side (L) until its trench will be dug between the slate border and the pineapple guava tree (R).


Enjoy your habitat thinking-out-of-the-box creations.  Nothin is debris in a habitat garden food forest!

Tony

Feb 042013
 
Close-up of nearly removed apricot tree and its rootball.

Time to remove the apricot tree, Grandpa’s Apricot Tree, in our back garden.  Almost no fruit in at least 6 years.  Seasons, soil, water, and our hungry food-producing mindsets will wait no longer!  Time to nurture another tree.  We will plant a Santa Rosa plum tree, who’s namesake is the next town over from our sunny California garden.


Almost!  I almost got the entire apricot rootball out before coming to my senses.  Yes, I like to create an animal habitat EVERY time I dig into the soil.  But, I thought I would shortcut that vision because so many parts of the garden call for my attention.  (Truth be told, the garden would do very well without my meddling.)  Then, with ¾’s of the root ball removed and even less breath in my lungs, I came to my senses. 


Yes!, this is a habitat.  I can stop right here.  This rootwad DOES NOT have to be completely removed from the bed.  The Santa Rosa plum can be planted next to the almost-removed rootball of Grandpa’s Apricot Tree.  My exhausted muscles can think of many reasons why to keep the leaned over, buried tree trunk.  Watch today’s video and the next 2 to come to find out why!


Habitat it and they will come!


20130130 Grandpa’s Apricot Root Worlds Fair 1 of 3

 (video):

20130130 Grandpa’s Apricot Root Worlds Fair (pics):

The apricot tree was pruned to make removal easier.The apricot tree was pruned to make removal easier.  Note the old grafting sites (with yellow grafting sealer); even new stock would not produce fruit.  A shame – the tree growth was vigorous with beautiful structure and wood/bark.


A tree is down!  Repeat, a tree is down!A tree is down!  Repeat, a tree is down!  After cutting some roots with a shovel, and bronco-riding the tree, other roots snapped and the tree was rendered a soil dweller.


Close-up of nearly removed apricot tree and its rootball.Close-up of nearly removed apricot tree and its rootball.  This is where, when I discovered that the tree need not be completely removed, that the soil-rich rootball makes a fantastic garden animal habitat.


Enjoy your habitat thinking-out-of-the-box creations.  Nothin is debris in a habitat garden food forest!

Tony

Jan 312013
 

Too much shade!  The pine tree above Pine Brush Pile animal habitat is way to healthy and has grown enormous over the last 6 years.  We want more sun to get to the fruit trees and vegetables below the tree.  So, the pine tree will be severely pruned today.  An owl eating perch is thrown in for good measure.  AND, of course, more habitat materials for Pine Brush Pile.

20130130 Pine Tree Pruning (video):


Enjoy your habitat thicket creations.  Nothin is debris in a habitat garden food forest!

Tony


Dec 142012
 
Heavy limbs weighing down the lighter sticks on Food Ridge West.


Today is my fourth posting of rebuilding hugelkultur Food Ridge West.

Go to Hugelkultur to see a description of this European garden art.

Today’s video shows the final stages of building the base of the hugelkultur.  Its “keyhole garden” shape is discussed.

Hugelkultur 4 of 4 (video):


From Tony’s project (pics):

Heavy limbs weighing down the lighter sticks on Food Ridge West.  Heavy limbs weighing down the lighter sticks on Food Ridge West.  This woody mesh of twigs, sticks, and limbs makes a good base for organic debris layers to come.  Note all the nooks and crannies that will be available to garden critters.  HABITAT!!!


Entrance to the keyhole garden hugelkultur, Food Ridge West.Entrance to the keyhole garden hugelkultur, Food Ridge West.


Close-up view of entrance to the keyhole garden hugelkultur, Food Ridge West.Close-up view of entrance to the keyhole garden hugelkultur, Food Ridge West.   The added layers of organic debris will rise over the vertical log (left, inside the keyhole garden bed), only to settle back down again next year.  Each year’s added layers mean better soil for crops.


Some images of hugelkultur.

For a detailed discussion,

clear graphics, and lots of pics of hugelkultur,

see Paul Weaton’s blog at:Click to go to Paul Weaton's blog entry on Hugelkultur.


Happy hugelkultur habitat making.  See you tomorrow.

Tony