Nov 032012
 
Young Pumpkin in Percy's Pearmain Portal

You have landed on Day 3 in this 6-day series of videos depicting the fine art of collecting/processing/storing pumpkin seeds.  Enjoy!


First some pumpkin pics:

Day 1 = flowers

Day 2 = vine

Today  = new fruit

Day 4  = green manure

Day  5 = seed saving

Day 6  = seed planting


THEN a video  re “Saving Happy Halloween Pumpkin Carving Seeds”.   6 videos (1/day) for the series!


Young Pumpkin in Percy's Pearmain Portal

Young Pumpkin in Percy's Pearmain Portal. Note the thick stem, a sign that this pumpkin is going to be a biggy! Also note how the stem comes off the vine at a 90-degree angle, which will allow the vine to sit on top of the soon-to-be large pumpkin. Note the shriveled, dieing off flower. See the next pic, which shows this pumpkin's growth a month later.


Adolescent pumpkin in Percy's Pearmain Portal

Adolescent pumpkin (maybe Junior High). Note 1) how the vine was dragged up on top of the pumpkin (the vine was alongside the fruit when younger; see previous pic) so that the growing pumpkin would not pull away from the vine. With the vine on top and pumpkin below, why wanting the fruit to come off of the vine at a 90 degree angle (as mentioned in previous pic) becomes clearer.


Young pumpkin growing across Rock Birdbath

Young pumpkin growing across Rock Birdbath. Note how quickly the fruit has grown yet the vine is not very developed beyond it. Also note how the young pumpkin still has the shriveled flower attached.


Years later, I am starting to really have fun with the lushness, almost unreasonable growth, of pumpkin vine.


Skyward Netted Pumpkin

Skyward Netted Pumpkin. Now this project has been fun! My goal was to have a pumpkin grow in the air, suspended off the ground. This pumpkin almost made it to the top, that is, to the crossing bamboo poles, where I was wanting a pumpkin to hang out for a while – at least till Halloween. Spore Lore’s blog entry, 20121030 Skyward Pumpkins and Happy Halloween, tells all.


Skyward Netted Pumpkin -- close-up

Skyward Netted Pumpkin -- close-up view. Note the thick stem, 90-degree stem, and the black plastic landscape netting that supports the weight of the pumpkin in the air on the not-so-strong vine.


And my favorite of the year…drumroll, please!


Skyward Nestled Pumpkin -- close-up view

Skyward Nestled Pumpkin -- close-up view. At last, a pumpkin vine has climbed up to the very crotch of the bamboo teepee AND fruited in a perfect orientation to wedge itself in FOREVER! You do it – I am not going to be the one to tell Skyward Nestled Pumpkin it’s time to move on.

Saving Happy Halloween Pumpkin Carving Seeds — 3 of 6


Happy seed saving and see you tomorrow.

Tony


Nov 022012
 
pumpkin growing up bamboo

You have landed on Day 2 in this 6-day series of videos depicting the fine art of collecting/processing/storing pumpkin seeds.  Enjoy!


First some pumpkin pics:

Day 1 = flowers

Today = vine

Day 3  = new fruit

Day 4  = green manure

Day  5 = seed saving

Day 6  = seed planting


THEN a video  re “Saving Happy Halloween Pumpkin Carving Seeds”.   6 videos (1/day) for the series!


pumpkin vine undergrowth

Pumpkin vine undergrowth. Note the older (dark green) segments of vine and the male flowers (far right) with their tall thin stalks.

Banana squash vine climbing up into pine tree.

Banana squash vine climbing up into pine tree in author's garden. Although not a pumpkin, the vine is very similar to a pumpkin vine. Pumpkins are a type of squash -- all pumpkins are squash but not all squash are pumpkin (very new proverb).


A pumpkin is a gourd-like squash.

Banana squash vine climbs higher into pine.

Banana squash vine climbs higher into the pine tree. Note what an adept climber the vine is, sending curled tendrils out in front to grab hold of/wrap around ANYTHING.


pumpkin growing up bamboo

Pumpkin vine growing up a bamboo trellis pole. The "curly tendrils" (see above pic) on the right, will lead in front up the climbing-for-the-sun vine, wrap around the pole, and support the vine as it continues to bear fruit and grow higher. Note 1) the intentionally left branch stub on the home-harvested bamboo pole, and 2) how nicely that hold-on point secures a soft hanger for the vine (always carry more hair ties than you need for your hair and a few extra rubberbands).


Saving Happy Halloween Pumpkin Carving Seeds — 2 of 6

Happy seed saving and see you tomorrow.

Tony

Nov 012012
 
European Honey Bees gather pollen in a squash flower.

Now that Halloween is over (in a couple of hours), I want to run through what to do with the seeds from pumpkin carving.  The next few days will be a new video each day depicting the fine art of collecting/processing/storing pumpkin seeds.  Enjoy!

Oh, about seeds, so glad I can legally harvest from the pumpkin that we have — that might not be the case some day if we lose food freedoms from mega agriculture corporations.  Keep food (and seeds) available to the people — vote Prop 37 (California)!!!

First some pumpkin pics:

Today = flowers

Day 2  = vine

Day 3  = new fruit

Day 4  = green manure

Day  5 = seed saving

Day 6  = seed planting


THEN a video  re “Saving Happy Halloween Pumpkin Carving Seeds”.   6 videos (1/day) for the series!


male pumpkin flowers

Male pumpkin flowers have a long thin stalk as long as a foot from the vine. These flowers are pollen suppliers -- they will not die back and leave a fruit underneath the shriveled petals, as do the female flowers.


female pumpkin flower with midges

A female pumpkin flower being pollinated by a small swarm of midges.


female pumpkin and base

Female pumpkin flower with typical bulbous base, close to the vine. Too early to tell whether pollination was successful -- the fresh petals tell me that this flower bloomed the night before or early this morning. The petals will die back by the next day. If she is not pollinated, the small base will shrivel up and fall off the vine. If she is pollinated, the flower petals will still die back, but the bulbous base will grow bigger -- a pumpkin is born!


European Honey Bees gather pollen in a squash flower.

European Honey Bees gather pollen in a squash flower. Note 1) the dusting of pollen on the bees' entire body; 2) the chamber-like ovule of this female flower; and, 3) the nectariferous area, or the inside bowl , that collects falling nectar -- sticky and hairy!

An interesting blog explaining pumpkin flower pollination, including hand-pollination (being your own pollinator):  Pumpkin Nook

Saving Happy Halloween Pumpkin Carving Seeds — 1 of 6

Happy seed saving and see you tomorrow.

Tony

Jan 112012
 
20120108-LTH-retaining-wall

Garden Log (what I did):

071509 LTH -- soil harvest

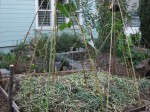
071509 Leaf Trench Highway. Soil has been harvested from the trench, between the slate walk path and the planting bed. The trench will be prepped for more soil making, starting with a base of straw from the awaiting bale. Since this picture, lots of organics have been composted onto and into the trench. Those organics include: tree prunings, wheat straw, alfalfa straw, oak leaves, carbon harvest (for example, pumpkin vines), twigs and stout tree limbs, wood chips, and horse manure. Beautiful, rich, high quality tilth soil has been harvested several times from the trench.

1. Constructed a low retaining wall to increase the soil volume of a planting bed, Leaf Trench Highway.  Leaf Treanch Highway got its name back in 2007 when we were installing irrigation supply to our garden’s back corner.  The water supply was trenched along a walk path, buried about three (3) feet and encased in 3″ perforated plastic drainpipe.  The depth and casement were to allow “mistakes” in the garden — a shovel could graze the drainpipe and might not break through and bust the water supply.  Lots of digging since then, and no busted trench pipe, yet.  The trench was called a “highway” because, when filled with leaves, or other organics, it’s a corridor for critters to move about the garden.

So, there we were, in 2007, with a sizeable 3-foot deep trench running along the property line’s planting bed.  We decided to use the trench to make soil; we would use the trench to turn compostable material into planting soil.

20110929-LTH-Apples

"Opps! Did I spill that?" No, Anita, Leaf Trench Highway is getting a rotten apple harvest -- Sebastopol's finest for our dear soil-making critters.

About every six months, the trench is dug up for a soil harvest.  That harvested soil is then used to amend the soil in the gardens.  And yes, sometimes waiting the six months or so is difficult.  But having fresh, new, teeming-with-microbe, alive! soil on hand when we do harvest is all that much more a treat after the wait.

20100604 LTH -- potatoes

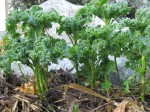
Potato (broad-leaved), garlic (along fence), red and white clover grow in Leaf Trench Highway in the summer of 2010. The red and white clover serve as both insectary and nitrogen-fixing plants.

This time around,  in 2012, I want to grow a crop above the composting trench.  I want us to produce a garlic and vegetable crop WHILE the trench is composting.  I have also found that new crop love a good compost under it.  BUT, the compost can not be too hot or the new crop will burn.  For this planting, there is a good base of wood chips, green manure, oak leaves, and a recent magnolia tree pruning.  Especially with the magnolia twigs and limbs, those bulky organics will supply microbes, miosture, and nutrients to the growing crop.  Also, as the crop plants grow, their roots will travel the moist, nutrient-rich paths along the decaying wood.  Great mulch for the coming dryer months.  Throughout the spring, we will harvest salad from the composting trench.  By July, the garlic will be ready to be dug up — harvest garlic, harvet soil.  Garlic for the kitchen, soil for the garden.

20120108-LTH-retaining-wall

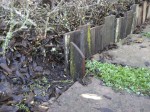
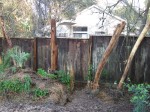
Low retaining wall built to increase the soil capacity of Leaf Trench Highway's planting bed. Old redwood fence boards were cut in two-foot lengths and pounded into the gap between the planting bed and the vertical slate border. Using a wood block between the fence board and the sledgehammer kept the fence boards from splitting.


20120108-LTH-retaining-wall, close-up

20120108-LTH-retaining-wall, close-up. Note the beautiful mosses and lichens on the old fence board. Not only is this FREE!!! redwood fence board functional (it will last many years in the soil), it is also beautiful. Moist soil from the planting bed was rubbed into the board cuts to instantly age those fresh-cut surfaces -- we are talking art here! I am interested to see if that soil smear will promote moss growth on the top edges of the boards. Stay tuned.

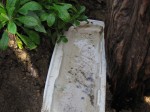
2. Manure run.  Collected both hot (fresh) and cold (old) horse manure from my secret source (nothing personal).  The hot manure was laid down at the bottom of the fence boards to create a little heat for the wintering crops.  The cold manure, which is pretty much a sandy loam soil because it has broken down for so long, was thrown on top of the bed.  That cold manure was thrown into and on top of the magnolia tree prunings, enough of it to plant the crops in.

20120107-manure-collecting

Collecting horse manure from a neighbor's pile. The bins/barrels help keep the job cleaner and easier. Using the barrels, my truck does not have to be washed afterwards and the manure can sit in the bins until ready for use. Sure is nice to load it once (into the barrels) but not have to clear it out of my truck's bed the same day. Note the looseness of the fresh (hot) pile at the rear of the truck. That pile was moved twice -- once to get it out of the way so the buried old (cold) manure could be harvested, then again to fill up the hole that cold manure harvest left. Perhaps in 6 months, that filled in hole will be cold manure soil itself. Just another example of our wondrous revolving World at work.

20120110-LTH-garlic-planting-2

It's late, but the garlic is in. Come tomorrow, I will throw a thin mulch of rice straw over the veggie seeds and garlic starts. Note how the low retaining wall of recycled (reused) fence board allowed enough soil to be added to the bed to cover most of the magnolia prunings. Will be exciting to see what crops actually do rise out of the straw mulch and to see how well they thrive in this compost, soil-making bed. Oh, did I tell you -- it's an experiment. 🙂

You, the Habitat Gardener (reflections):

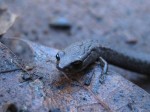
1. Leaf Trench Highway is a major no-toll pathway in our garden.  True, there is often construction along this roadway, but the improvements are always worth it.  This year’s road upgrades include last year’s woodchip pile from Santa Rosa’s waterways cleanup (oak and willow), oak leaves from the neighborhood, our ridiculous Jack-in-the-Beanstalk pumpkin patch green manure, the magnolia tree’s prunings, hot manure, and cold manure soil.  Microbes party down!  All insects and amphibians welcomed.  Just add water, as the soon-to-come rains will do, and the entire length of Leaf Trench Highway will be a mess of healthy fungi, vegetables, flowers, microbes, crawly critters, and birds.  And that’s just at ground level.  The length of the trench, along the fence, is a fedge — food hedge, a permaculture term.  That hedge planting includes fig, pineapple quava, loquat, and pomegranate.

2. Our soil gets better every year as we grow more food each year.  And we share — without an atom of pesticide, herbicide, or fungicide, the trench and fedge will take on a natural balance.  The critters will get some of the planted crop, but by far, we will get our fair abundant share.

Happy soil making to you.

                                                            Tony


The Next Day and Night:

1. More cold manure soil was added to the bed tocover the garlic and to give the veggie seeds more soil to establish themselves in.

20120111-LTH-veggy-planting

Bowl-O-Seeds. Rooting powder was used to help the seeds germinate, a tall task during these wintery days.

2. The vegetable seeds were all mixed together with rooting powder (only because I didn’t have any mycorizzae spore on hand).  Life is good!, especially when I get to open dozens of seed packets that I prepared throughout last growing season.  Round and round, mixed in a large stainless bowl, or bucket, and dusted with a little love (spore or rooting powder).  Then I’ll carefully toss the seeds out onto a prepared planting bed — a dash here, a dash there, some over my right shoulder, some underhanded between my legs.  Most importantly, I get to have fun being ridiculous.  I get to plant way too many seeds.  Yes, I work hard to collect seeds all year long so that I can have a Chia Pet garden.  Too many plants that grow too much means I will eventually get to havest them, in whole or in part, and reap the green manure they are.  I will be harvesting carbon — all that alive, green plant material is merely bottled up sunshine to be poured onto the compost pile.  Sun >>> plants >>> photosynthesis >>> juicy packets of carbon >>> Tony’s compost >>> SOIL MAKING.  And with that carbon-rich soil, we will grow more STUFF, whether it be flowers, food, or fodder.  And we will live happily ever after.

The seeds I grew and collected and mixed together are cilantro, parsley, Queen Anne’s lace, bok choy, gopher plant, impatiens, fennel, round zuccini, calendula, “Primo” danelion, and chard.  Store-bought seeds that also became part of the mix are broccoli, cauliflower, and lettuce.  SOMETHING ought to grow!

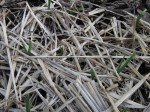
3. The seeded bed, also with its garlic starts, was mulched with rice straw to keep critters away from the seeds and to keep the seeds moist for germination.  The mulch will also help the seeds receive waterings and/or rain without being washed out of the planting bed.  Perhaps too heavy a cover of straw to be left on the young sprouts.  BUT, I will keep an eye on the bed and will thin off some of the straw in a week or two.  I will be curious to see what plants actually do come up during these frosty nights and cool days.  Nice to have some ground warm perculating upward toward the seeds from the hot manure below.  Even if nothing were to germinate now, surely some seeds will germinate further down the year when the sun warms the soil and spring rains moisten it.  How fun to wait and see.

20120111-LTH-veggy-planting-mulched

The seeds have been sown and the rice straw mulch is in place. A little water. A lot of waiting. Soon enough, though, a forest of food and flowers.


Feb 212011
 
Close-up of black bellied slender salamander.

Garden Log (what I did):

3-sided carboard storage bin for adobe soil.

3-sided carboard storage bin for adobe soil.

1. Made a 3-sided cardboard box for storing adobe (clay) soil.

You, the Habitat Gardener (reflections):

1. Time to get to some serious gardening in during these wonderful warm days of winter.  First that comes to mind, after the long list of jobs that I am procrastinating, is to get some better soil on hand.  Many ways for me to improve our garden’s soil — fetching oak leaves from the curb, collecting fallen leaves and rotten fruit from under a neighbor’s persimmon tree, hauling a truckload of free horse manure, or buying a truckload of mycellium-rich compost from a mushroom farmer.  Those are just a few ways that are currently easiest for me.  As with the infinite wonder of soil, how to improve it is also infinite.  Yes, I do like to gravitate to the FREE, or at least fairly inexpensive, sources of material.

The adobe bin between stacked roofing shakes and the compost bin.

The adobe bin between stacked roofing shakes and the compost bin.

I will want to empty the 55-gallon plastic drums that I use for collecting soil/manure/compost material.  Right now, half of those bins/barrels are filled with excavated adobe soil from the depths of Salamander Resort (see Watered Clay).  What to do with the adobe?  Lucky for me, we have some extra room next to our compost bins.  We’ll pile the adobe there and feed the compost with it over the years.  Adobe by itself is a tough sell for plants.  But mix that adobe into already rich compost and wala!, you have a superb mix of soil tilth (consistency) and nutrition.  A back-the-truck-up visit to our town’s cardboard dumpster and gathering some pruned shrub limbs is all the supplies we’ll need to create an outdoor storage bin for the adobe.

A slender salamander discovered between wooden roofing tiles (shakes).

A slender salamander discovered between wooden roofing tiles (shakes).

Clearing a space in this out-of-the-way part of the yard proved interesting.  First off, you should know that the immediate yard was reclaimed by ivy, thick ivy.  Sheet mulching a couple of years ago has proven effective in keeping down the ivy.  And when clearing away the stack of roofing shakes that were next to the compost, I found out just what a great habitat the back yard is.  Salamander Haven!  Sheets and sheets of moist cardboard covered under decaying straw — the black bellied slender salamanders (Batrachoseps nigriventris) of our neighborhood have thrived here.  Dozens were under and in the small roofing shake pile that I re-organized to make room for the adobe bin.

Black Bellied Slender Salamander

Black Bellied Slender Salamander. Note the minimal front AND back limbs.

I wanted a flat surface to create the cardboard adobe bin/box.  Getting the surface flat mostly meant sorting through some ivy vines (no sheet mulching here) and the crumbly wood shakes that were at the bottom of the pile.  Lots of salamanders to avoid hurting, too.  After piking out the shakes worth saving, I made a pile of the old scraps and some rich soil to house some of the salamanders not insulted out of their habitat.  All that was then covered with the thickest cardboard to form the bottom of the bin.

Close-up of black bellied slender salamander.

Close-up of black bellied slender salamander found in wooden roofing tile stack.

True, perhaps a very rough day for some relocated salamanders, that is, those that went off into the surrounding vegetation to escape the upheaval of their Roofing Tile Palace.  But, also a good day for those that will stay in the immediate area.  Not only do those local salamanders get new accommodations in a well-stacked highrise apartment complex, but also they get yearly renewable membership to Anita’s Adobe Assembly.  Actually, the salamanders will probably not be too interested in the adobe clay pile itself.  My guess is, though, that the moist underneath and sides of the clay pile will be this summer’s, and many summers to come, happenin’ place if you’re a sally.  The clay pile will keep cool and moist long after the surrounding soil dries up from warmer weather.  That moisture-laden microenvironment will attract much food and shelter for the salamanders.  So, salamanders, sorry for the unannounced housing move — hope the neighborhood improvements make up for any inconvenience.

Adobe anyone?

…………………………………………………………Tony

Feb 022011
 
The new Olympic-sized swimming pool at Critter Convention Center.

Garden Log (what I did):

1. Installed an underground watering hole habitat, called Dano’s Great Newt Grotto.

Trellis habitat, House Finch Hideaway.

Trellis habitat, House Finch Hideaway. The subterranean habitat, Dano's Great Newt Habitat, was installed while the Center Pole posthole was being backfilled.

You, the Habitat Gardener (reflections):

Center Post (2 posts) in ground, yet to be backfilled.

Center Post (2 posts) in ground, yet to be backfilled. The posts were dug in on the back side of Captain Cicada's Buried Treasure, a buried wood pile animal habitat. The adobe soil in the foreground is from the posthole digging and covers the small hill's topsoil.

1. The celestial heavens were so kind to me the other day.  Dan and I were on our way to completing an awesome garden project — a 6-post two-tier trellis built to grow food and provide privacy.  We had just lowered the Center Post (which is actually 2 posts; see House Finch Hideaway — Completed ) into its hole when the noontime lunch whistle blew.  Dan was off to follow his stomach’s commands.  Cool!, now I have some time to throw in a habitat up against the center posts before the area is backfilled.  A quick search of material caches and I was back with a toilet tank top, a small piece of flagstone slate, two old kitchen tiles, a water-catching boulder, and a bucket lid.  Habitat here we come!

The habitat's tiolet tank top will catch and hold water.

The habitat's toilet tank top will catch and hold water.

Water.  So often when building a habitat, I include a focus of making water, or at least moisture, available for garden critters.  Perhaps I am so drawn to water because one of my strongest passions in building animal habitats is to increase amphibian populations in residential gardens.  And amphibians LOVE, thrive, and do water well (pun accepted!).  This habitat’s major water feature is a toilet tank top rescued from a dumpster.  “Help, help, please help!”, I faintly heard coming from the bottom of a commercial renovation project’s 10-yard dumpster.  So I took the beautiful uncracked enamel critter swimming pool home with me and vowed to incorporate it in a habitat.  Alas, Toilet Tank Top is delivered to the soil and its critters while Dan is off at lunch.  A little water in the upside down lid helps me install it level (to hold the most amount of water possible).

The new Olympic-sized swimming pool at Critter Convention Center.

The new Olympic-sized swimming pool at Critter Convention Center.

The enamel coated top side of the toilet tank lid seals the pottery and enables it to hold water.  The underside of the lid, which is pictured holding water, will absorb some of that water because it is not enamel coated.  But that’s okay — moisture-loving critters, like insects, snails, slugs, salamanders, frogs and toads, will seek out that cool dampness in the dryer months.

I stand on the upside down lid to press it into the adobe soil at the edge of the posthole and up against the Center Post.  It sets in firmly and gives me confidence that it will hold at least some water, that is, stay level, for a long time.

Flagstone and kitchen tile cover the habitat's grotto.

Flagstone and kitchen tile cover the habitat's grotto.

Now to protect the top of the swimming pool to keep it from completely filling with soil.  Some soil will likely backfill into the swimming pool, and that’s okay, but we would like some of the upside down toilet lid’s volume to be available for water.  Completely sealed off would not be good either — the critters would think the pool is closed.  “Oh man, we always come on the wrong day!”  A small piece of flagstone slate and kitchen tiles are the strong, non-biodegradable materials I come up with to protect the habitat’s pool of water.  Two kitchen tiles are used to add strength and to provide another crevice (between the tiles) that critters can take advantage of.  Sure there’s a gap between the tiles and the slate but we’ll deal with that shortly.  For now, we’re sitting pretty because the swimming pool was just upgraded to a grotto.  How European!  The subterranean pool, or grotto, will shelter and feed many a microbe and larger critter that had never dreamed of travelling to such places.

Water-holding boulder sits above the grotto.

Water-holding boulder sits above the grotto.

Now to cover the small gap between the tiles.  And I just happen to have a bucket lid that will cover that gap.  One good thing about the plastic lid is that it will last a zillion years. Sure, some people would cringe about burying plastic in the garden but I figure that the trade-offs here are worth it.  If it never breaks down, then some critters will have shelter security.  If it does break down, then we are doing our part to return this human-made atrocity to the soil.  Hey, why get out of bed in the morning if your rationalization system is not intact?!  And now back to the plastic bucket lid on top of the kitchen tiles and the flagstone slate.  Yes!, the bucket lid turns out to more helpful than I thought it would be.  Not only will it cover the gap, but also it is a coaster (like a table coaster protecting delicate wood) for the brittle tile and crackable slate.  Now a good-sized rock, AKA boulder, can be stacked on top of the grotto, tiles, and slate.

Leveling the boulder to hold water.  Wood frame protects the tile.

Leveling the boulder to hold water. Wood frame protects the tile.

Multi-tasker boulder will 1) keep the materials below it securely in place because of its heavy weight, 2) provide temperature modulation to the habitat, and 3) hold a smidgen of water in the small indentations on its top surface. That’s pretty much the bulk of the habitat, but now I want to take measures to protect this underground waterhole, this subterranean grotto.  Because it’s underground, or hidden, foot traffic could easily kick it apart by accident. I grab a couple of fireplace logs and frame the exposed tile corner.  That sits pretty but why leave things up to chance?

Firewood log staked with gap awaiting compost fill.

Firewood log staked with gap awaiting compost fill.

I take the extra time to secure the downhill side of a log with a hefty wooden stake pounded into the ground.  The stake is surely very secure BUT I missed my mark. The stake is a couple of inches away from the fireplace log instead of snugly up against it.  Once again, THE PROBLEM IS THE SOLUTION (a permaculture axium).  In other words, there’s good to be found here so why not go with that?  Lucky for me, I sometimes take my own advice.  I snug the firewood log up against the post to expose a gap alongside the habitat.  That gap, or couple of inches “off”, will now allow me to throw in some nutritious compost soil. There will be more good soil for the jasmine vine I will plant above this habitat.

Jasmine vine planted above Dano's Great Newt Grotto.

Jasmine vine planted above Dano's Great Newt Grotto.

Time to plant the jasmine vine that will grow up Center Post and create a thicket on the trellis.  The grotto habitat is nearly complete except for planting and cosmetic issues.  The jasmine vine’s roots will help secure the “hillside” of soil and help tie together the habitat’s elements.  Perhaps those roots will find the grotto and drink its water — hard to say because the roots will not develop in the intended air cavity of the habitat.  In the end, though, I vote that the jasmine will be a happy camper as a result of the grotto habitat.  If nothing else, the poop factor will benefit the jasmine — there will be so much poop (that feeds the soil) from the snails and slugs that come to vacation at the grotto.

Compost soil is strewn over the habitat and surrounding area.  The jasmine vine is wiggled into position next to the boulder and surrounded by as much compost soil as will stay on the little hill of Captain Cicada’s Buried Treasure.  Forget-me-not plants that were moved to the side for protection are returned to the hill, above the habitat.  Some bamboo stakes are pounded into the ground and strung together to make small fences to protect the area from foot traffic.  Lastly, old straw mulch is used to keep the compost soil and plants in place.  Also, the old straw mulch will keep the area moist and humus-rich as it breaks down.  The decaying straw is a habitat unto itself!

Dano's Great Newt Grotto habitat is buried under old straw mulch (left).

Dano's Great Newt Grotto habitat is buried under old straw mulch (left). Grape cuttings at a post's base for the trellis habitat, House Finch Hideaway.

What a great day!   A habitat within a habitat day.  Hard work and looking forward to my vacation.  See you at The Grotto.

……………………………………………………. Tony

Jan 302011
 
trellis habitat House Finch Hideaway

Trellis habitat House Finch Hideaway will support a thicket of vines.

Garden Log (what I did):

1. Completed installation of the trellis habitat, House Finch Hideaway.

You, the Habitat Gardener (reflections):

Trellis wire on center post.

Trellis wire on center post. Note the crevices in the post's wood -- great shelter for small criters willing to make the climb.

1. Today’s job was to finish the trellis habitat, House Finch Hideaway.  For previous entries re this project, see HFH — Installed Posts and HFH — Trellis Wire Installed.  To most people, this job would be a trellis installation to create back-fence privacy, period.  But for me, this project is a great opportunity to grow food for our table.  Also, the trellis will provide food and shelter for critters.  I see a thicket of perennial jasmine vines with knock-me-out fragrant flowers, a sun-basking wall of hanging fruit, subterranean crevices and water for amphibians, a ladder system of wood posts for insects and lizards, perches and nesting shelter for birds, and a rising sun backlighting enormous grape and fig leaves.

Top cross wire loosely in place (before stapled).

Top cross wire loosely in place (before stapled). Note the post's lean away from the back fence.

After laying out and attaching the top wire loop with a Gripple lock, I realized that the wire was not as tight as I wanted it to be.  The distance between the two center posts was too long.   A 5th post, a true center post, will bridge the gap and prevent the someday vegetation-laden wire from sagging in the middle.  All the better to know now that my original plan for four posts was unrealistic.  Besides we can milk this mistake.  I’ll get the most out of changing the plan by a) charging more for the job, b) installing more beautiful driftwood in the garden, and c) installing a separate animal habitat when digging the hole for the new center post.  About a) charging more — Oh well, I forgot this is an unpaid job.  About b) more driftwood — YES!!!  How better to fix a problem than to pull out the driftwood?  Better yet, the center post is a union of two pieces of driftwood.  About c) another habitat — Dano’s Great Newt Grotto is born; see my future post (I’m going to bed!).

Base of center post yet to be backfilled with rock, gravel, and soil.

Base of center post yet to be backfilled with rock, gravel, and soil.

We want Center Post to rise about a foot above the 7-foot-high top cross wire.  That one foot height over the wire will be a critter perch.  Perhaps a bird, squirrel, or a very stupid insect or lizard (wanting to be so visible) will use the lookout.  Our post is 9 and 1/2 foot long, so that does not leave too much wood to be buried below ground.  First off, give up on the one foot and settle for a 6″ perch.  Then, the post can be buried 2 feet (9.5-7.5) — way not enough for that heavy piece of tree to stay vertically suspended AND support the heaviest load of the trellis.  What to do?

Center post base (left) supporting center post pole (right).

Center post base (left) supporting center post pole (right). Note the available critter shelter between the two pieces of wood.

Another piece of driftwood comes to the rescue.  The second piece of wood to become Center Post is a glorious redwood root section.  Being of redwood root stock, it is extremely dense, insect resistant and strong.  That piece is dug into the ground about 5 feet and snugly holds up the center post pole.   In fact, the base piece perfectly cradles the post piece, making a perfect lean forward away from the fence.  Perhaps that lean away from the fence will keep the someday rotting posts from crashing through the back fence.  Fences make good neighbors AND busting up the fence between you and your neighbor makes for trouble.  Therefore, the heavy and strong Center Post has a slight lean away from the back fence.

grape cuttings at left end post

Grape cuttings at left end post. The small "wood chip" pieces of grape vine will make friendly mulch for the soon-to-thrive vines.

Plenty of rocks were used to fill in Center Posts’ hole.  The rocks will better pack around the wood posts because they will not compress like soil fill does.  Also, the rocks and gravel will help the posts stay dryer in the ground, which will slow down their rotting.  Not only will water filter through the gravel better than soil, but also the rocks and gravel will not retain moisture like soil or clay does.  Less water retained means dryer posts.  I also like the use of the larger rocks because cavities will be created around them during the natural settling process (of the soil, gravel, and rocks).  Those cavities will shelter critters.

Compost soil was used to fill in the remaining post bases and grape cuttings were planted at the base of a couple of posts.  The Center Post’s habitat, Dano’s Great Newt Grotto, incorporated a healthy transplanted jasmine vine rootball and short vine strands.  Those short vine strands will quickly thrive and climb up the waiting stake, to the Center Post, and then off in both directions along the cross wires.  Short stake “fences” were made around a couple of the post planting to keep foot traffic from destroying the plants.  The planted cuttings were then mulched with old straw to protect the soil from heavy rain.

Vines at base of posts -- caged and mulched.

Vines at base of posts -- caged and mulched. Jasmine is far left, next to tallest stake. Grape is right, inside short stake fence.

So exciting to have a planting in place.  Training the vines up the posts and weaving a living wall with flower and fruit vines will be fun.  What neighbors?  Oh yes, we have neighbors to the back of us, behind the vegetation wall.

Enjoy the regeneration of spring.

…………………………………………………………………… Tony

Jan 282011
 
Kale Forest

Garden Log (what I did):

1. Strung up top horizontal wire on House Finch Hideaway trellis habitat.

2. Watered front garden, played frog, and surveyed kale bed.

You, the Habitat Gardener (reflections):

Siting cord to level wire position.

Siting cord (yellow) used to level wire position. Note this temporary cord is a little high on the left. Solution: loosen up left endpost, tighten down right endpost.

1. A few hours of glorious sunshine and time to work the garden today.  My goal was to string up one of the horizontal wires of the trellis.  The horizontal wires will bear the heavy weight of fruit vines and jasmine flower vines.  My first assignment was to assess the bulk of wood each post had at the height I want the top trellis wire to be stretched, which is 7 feet off the ground, or about a foot higher than the back fence height.  All four posts look bulky enough to take the bolts I intend to use to keep the cross wire from sliding down.  I’m using bolts and not simple fence staples because I feel the bolts are more macho, they will not ever pull out like a staple might, AND they were free; thanx again, Tony, for thinking of me when cleaning out your garage.

As explained in my last post regarding House Finch Hideaway (House Finch Hideaway — Installed Posts), the posts have been left loose in their postholes.  In other words, the posts can wiggle and waggle (especially if Pa is strumming his ukulele) in their holes while the end post and cross wires are being tightened.  Backfill to secure the posts will come in due time.

Using Gripple tool to tighten endpost wire.

Using Gripple tool to tighten endpost wire.

End post wires were doubled from the earth anchor eye to the post.  Also, each pass of the wire around the post was wrapped twice to distribute tension.  The end posts will bear enormous weight/tension from the combined weight of the two inner posts, all the cross wires and all the vines and fruit on those wires.  That’s a lot of weight!

I left some slack in the end post wires because the slack can always be taken up, whereas too tight means cutting wire, installing a patch wire, and then reconnecting the Gripple lock.

I guessed the height of the top cross wire on each end post, drilled bolt holes (2 bolts for each end post), and strung a very visble yellow cord to mimic the top wire.  Almost level, with the left end just a hair higher.  Cool!, level can be reached by pulling down on the right end post — a perfect example why leaving some slack in the end post wires was the patient, wize way to go.

Left Endpost horizontal wire under bolt.

Left Endpost horizontal wire under bolt. Bad.

In comparison to an end post wire, the top cross wire has much less weight to bear — it has to deal only with the weight of the one wire itself and only the vines/fruit on that wire.  Therefore, the top cross wire will be a simple loop from one end post to and around the other end post.  A Gripple lock gathers and holds the two ends of the loop together.

Top cross wire above supporting bolt.

Top cross wire above supporting bolt. Good.

But not so fast young man!  Not so easy for me to string up the top cross wire.  The 13 gauge vinyard wire did not want to bend around the endposts.  Rather, it wanted to spring away from the post, slipping under the bolts meant to support it.  Frustrating to repeatedly lose the wire’s top (above the bolt) position till I had an attitude adjustment.  Those are long bolts — back them out till the wire is tightened between the posts and then screw them back in.  Wala!, all was not lost.  The extra long bolts did catch and hold the wire and the top cross wire was installed.

2. This is an exciting time of the year for me.  Frogs have started to show up, in the auditory sense, in our neighborhood.  How sweet it will be to have a frog or two or three croaking in our garden.  Ribbit, ribbit, ribbit — a beautiful way to drift off to sleep.  So I took a tour of our front garden today as if I was a visiting frog.  “Yes, I could live here.”

Kale Forest

Kale Forest from a frog's viewpoint

The kale bed struck me as quite beautiful from ground level, from the level of a hopping frog stopping by to live a few months in our garden.  Those kale stalks and leaves look like a small forest.  And that’s Mount Hood rising behind them.  Yes, my neighbors are patient with me.

Kale in Rock Ledge Veggie Bed.

Kale in Rock Ledge Veggie Bed.

Rock Ledge Veggie Bed.

Rock Ledge Veggie Bed.

.


.

.

.

.

.

And then, this evening, my daughter and I heard a frog’s ribbit loud and clear from up against the house, not too far away from Rock Ledge Veggie Bed.  How cool is that?!  Perhaps my watering the front garden attracted it.  Either way, I’ll take such instant gratification.

Ribbit.

………………………………………………………………..Tony

Jan 272011
 
Close-up of garlic sprouts.

Garden Log (what I did):

1. Watered garlic sprouts in sidewalk veggie bed.

You, the Habitat Gardener (reflections):

1. Our veggie bed along the sidewalk, Straw Bale Recliner, is sprouting garlic through the straw mulch.  Yay!, the garlic bulbs that I got from the supermarket germinated — I was somewhat anxious about whether they would sprout or not because I have been told that sometimes the markets irradiate garlic bulbs to prevent sprouting in the market.  Makes sense but I have been successful with the big-market garlic a couple of seasons now.  And yes, the supermarket’s price of garlic is more friendly to my gardening budget.

Garlic sprouting in Straw Bale Recliner veggie bed.

Garlic sprouting in Straw Bale Recliner veggie bed.

What an easy crop garlic is!  So glad that we planted the cloves before the New Year.  Nothing was growing in the beds anyway so what could we lose?  Come spring we will have both a crop AND soil that was loved all winter long.  Soil that was alive!  Soil that had a happy exchange of mineral nutrients, microbes, insects, earthworms, snails, slugs, and plant roots.  Soil that sent out green stalk ambassadors to capture the sun’s energy, make food with it, and send it to the developing garlic bulbs.

We mulched the newly planted garlic cloves with a light layer of straw.  The mulch protects the soil from a heavy rainfall and helps keep moisture in the bed so the garlic does not stop thriving.  So easy to lay the thin layer of mulch BEFORE the sprouts reach skyward.  What a pain to have plants sprout and then want to mulch the bed.  Been there, done that enough times to appreciate getting the mulch down during  planting.  Not only is mulching after sprouting difficult, but also doing so can damage a recently sprouted plant.

Close-up of garlic sprouts.

Close-up of garlic sprouting through a thin layer of straw.

Mulching during planting does present a trade-off, though.  If the mulch layer is too thick, the sun will not warm the soil enough, with air and moisture becoming trapped in the soil.  The seed/bulb will rot and die.  So, moderation prevails when mulching over a planted crop.  Hard to say amounts here — too many factors, like soil type, hours of sunlight, type of seed, weather conditions, to say just what that thin layer of mulch ought to look like.  Try it!  You’re bound to get it right eventually.  Yes, even you 🙂 .

Tony