Day 2 in this 6-day video series: Preparing patio pots for winter veggie planting.
First a video re “Patio Veggie Pots”, then some patio veggie planting pics (below the video):
Patio Veggie Pots 2 of 6 (video):
Patio Veggie Planting (pics):
Patio Planting Pots patiently wait for seeds and seedlings.
Fennel Pond (the spent fennel was just removed) sits high up in the clouds of fresh soil. Think like a critter!
Fennel Pond provides critters with water. AND, some microbes and aquatic creatures call Fennel Pond home!
LIFE comes to Fennel Pond, a critter’s pondside dream resort, in older times. Imagine you, the kneeling child, lost in the wonder of whirling Life in the shallow pool of Fennel Pond.
Happy planting veggies on your patio and see you tomorrow.
You have landed on Day 1 in this 3-day series of videos depicting amaranth seed collecting. Enjoy!
First a video re “Amaranth Seed Collecting”. Today’s video is part 1 of 3 (1/day) for the series! THEN some amaranth pics (below the video):
Amaranth Seed Collecting 1 of 3 videos
Amaranth in Tony’s Garden (pics):
Amaranth plant (Amaranthus sp. L.) can grow to 8 feet tall. A stunning plant in the garden, adding color and critter habitat AND a food source for the gardener.
Collecting seed AND giving insects/spiders time to escape.
Collected and dried amaranth seed with dried flowers and leaves. The seeds are yet to be separated out of the dried plant.
You have landed on Day 4 in this 5-day series of videos depicting propagation of tree collard cuttings. Enjoy!
First a video re “Collard Propagation”. Today’s video is part 4 of 5 (1/day) for the series! THEN some tree collard pics (below the video):
Tree Collard Propagation — 4 of 5 videos
Mulching Collard Cuttings (pics):
Dragon Spine Ridge planted with tree collard. The cuttings are mulched with straw, comfrey leaves, and collard leaves.
Close-up of tree collard cuttings mulched with straw, comfrey leaves, and collard leaves. The collard cuttings are left behind to share the wealth with slugs and snails looking for food -- but please leave our new transplants alone for now. Note the cut back comfrey plant to the left; its leaves are used to mulch around the new collard starts. Cutting back the comfrey releases nitrogen to the soil via the die-back roots AND through the decomposing leaves themselves.
Mulch surrounding tree collard cuttings. Note the chop-and-drop'ed dock plant to the right -- all its leaves were used to mulch with or add to the compost for soil making. The leaves were yanked but the plant is expected to grow back, over, and over, again.
Comfrey leaves guarding tree collard cutting. The tree collard cutting (center of leaves) has taken a beating by some night marauders, probably slugs and/or snails. Perhaps the hairy underneath of the comfrey leaves will deter critters long enough for the cutting to catch up and thrive.
You have landed on Day 5 in this 5-day series of videos depicting propagation of tree collard cuttings. Enjoy!
First a video re “Collard Propagation”. Today’s video is part 5 of 5 (1/day) for the series! THEN some tree collard pics (below the video):
Tree Collard Propagation — 5 of 5 videos
Young Tree Collard Starts (pics):
Tree Collard cuttings/starts after 2 month's growth, left pot only. Healthy!
Close-up of tree collard cuttings 2 months old. Lots of growth.
2 month old tree collard cutting growing on Dragon Spine Ridge. The specimen of focus here is the collard plant on the right. I pulled it up to inspect the root growth (to show YOU!), dug the roots back into the soil, and pruned off its top. Pruning off the top was advised (by me) because the inspection most likely destroyed some root mass. Less root mass, THEN less foliage will be supported. I also wanted to top off the young plant to encourage it to branch out lower rather than higher. See the next two pics.
2-month old roots of the young tree collard start. Good healthy soil, good healthy root growth. A good day!
Young Tree Collard is back on its feet, a rock to help it hunker into the ground after my rude root inspection.
You have landed on Day 3 in this 5-day series of videos depicting propagation of tree collard cuttings. Enjoy!
First a video re “Collard Propagation”. Today’s video is part 3 of 5 (1/day) for the series! THEN some collard tree pics (below the video):
Tree Collard Propagation — 3 of 5 videos
Transplanting Tree Collard Cuttings for Propagation (pics):
Transplanting tree collard cutting - 1 of 4. Note the bend in the cutting. Could be very difficult to stab this cutting into the ground and keep the leaves off the soil-mulch surface. But working with what we have, we'll lie the cutting on its side. The extra length of cutting (not pruning it back because of the bend) will allow more root development and better ensure propagation.
Transplanting tree collard cutting 2 of 4. Perfect fit for this tree collard cutting that has two 90-degree bends in it. Permaculture principle #1 = the problem is the solution. Because of its twists and turns, this cutting has primo real estate in the topsoil layer – look at how well the cutting, or new root system travels horizontally, along the rich microbe-abundant topsoil layer.
Transplanting tree collard cutting - 3 of 4. The topsoil layer is returned over the cutting. Leave it as you found it. The soil microbes have had a heck of a day (I hate moving!), but they will get a second chance at thriving, alongside the transplanted tree collard cutting. The green manure (boring people call them “weeds”) are also pushed back into place with the lightly packed topsoil. Those plants/greens are going to be mulched over (next pic) so they will boost the existing community of soil microbes. And the soil microbes and the tree collard cutting’s new roots will live happily ever after.
Transplanting tree collard cutting - 4 of 4. Rice straw (old, perhaps last year's bale) is used to mulch over the tree collard cutting. Moisture retention is critical while the cutting decides to thrive or not. Note the chop-and-drop'ed dock plant (lower right); see text below re chop-and-drop.
Note the chop-and-drop’ed dock plant in the above pic (lower right). Sure it could have been ripped out while I was digging in the transplant. BUT, I would rather have the dock plant’s large, voluptuous leaves soak in the sun’s rays, create carbon (sugars) and other organic matter in the form of more leaves and a more developed root system. THEN, I will come along again (for the umpteenth time!) and demand that the plant start all over. Besides perhaps emotionally scarring Dock, the leaves I’ve collected can be used to make mulch, compost, or salad. The root system that was supporting all that leaf growth dies back; the leaves are no longer feeding it. Those died-back roots then become food for the soil as well as organic material that retains moisture for the new roots to come as the dock plant regrows.
You have landed on Day 2 in this 5-day series of videos depicting propagation of tree collard cuttings. Enjoy!
First a video re “Collard Propagation”. Today’s video is part 2 of 5 (1/day) for the series! THEN some collard tree pics (below the video):
Tree Collard Propagation — 2 of 5 videos
Preparing Tree Collard Cuttings for Propagation (pics):
Collard Tree prunings, ready to trim the leaves from the stems for a meal. The remaining stems will be used as propagation cuttings.
Preparing Collards for the kitchen and for propagation. When given the chance, work outdoors. Good vitamin J (joy)!
Preparing Collards for the kitchen and for propagation. The edible leaves have been stripped off of the harder/woodier stems. For illustrative purposes, I arranged the stems on the table to show you how far each stem is pushed into the soil. The line between pruners and sheath represents ground level. Note how little leaf bulk is left on the stalk; root development is the priority.
Soaking tree collard cuttings for tomorrow's transplant. We recently had a good rain. Plenty of nutrition in that funky water. The bucket was left outdoors to collect water; leaves were a bonus.
You have landed on Day 1 in this 5-day series of videos depicting propagation of tree collard cuttings. Enjoy!
First a video re “Collard Propagation”. Today’s video is part 1 of 5 (1/day) for the series! THEN some collard tree pics (below the video):
Tree Collard Propagation — 1 of 5 videos
Preparing Tree Collard Cuttings for Propagation (pics):
Tree Collard (supported by bamboo poles). Harvesting the collard greens is as easy as pruning the stems and leaves off the main trunk. Leaves are cooked down/steamed like kale. Stem sections can be added to stir-fry. Thicker pruned stems are best propagated -- stuck into soil and left be; a little water helps get the roots going. Soon those cuttings will become their own tree.
20121107 Tree Collard trunk split during propping up trunk. The "tree" is best kept from growing too tall because the wood is weak -- more of a woody vegetable than a tree wood. The split was left to fare on its own -- an experiment on my part to see if the fast-growing plant will repair the wound quickly. My perfect kind of science experiment -- do nothing!
Tree Collard in March, showing the perennial leaf canopy -- food, privacy, and animal habitat. The young tree collard is growing just uphill from The Bog, between apple trees (top right of pic).
You have landed on Day 6 in this 6-day series of videos depicting the fine art of collecting/processing/storing pumpkin seeds. Enjoy!
First some pumpkin pics:
Day 1 = flowers
Day 2 = vine
Day 3 = new fruit
Day 4 = green manure
Day 5 = seed saving
Today = seed planting
THEN a video re “Saving Happy Halloween Pumpkin Carving Seeds”. 6 videos (1/day) for the series!
Seed Planting
Recording seeds used with camera, a portable note taker. These seeds were used to plant Straw Bale Recliner veggie bed, the planting area alongside our sidewalk. We planted first week of July and had a lush patch of sunflowers and pumpkin this fall. Skyward Pumpkins grew in this patch, from these seeds.
Seed Mixing Bowl with mostly green manure seeds -- vetch, fava bean, red clover, and white clover. I am a greedy planter; I want it all! I want my intended crop, perhaps some insectary plants to attract pollinators, and I want some green manure. Note that in the above bowl of seed, I mixed in soil. The soil will allow me to more thoroughly mix the seeds and give them bulk for my inexact hand dispersal (sometimes over my left shoulder).
Mycorrhizae to dust seeds before planting. Improves germination, plant survival, root development, plant happiness, plant emotional security -- JUST USE IT!
Dusted Sunflower and Pumpkin Seeds. The black dust is mycorrhizae spore; the granules might be spore, might be a nutrient. The black and white-striped seeds (left) are mammoth sunflower. The solid white seeds (top right) are pumpkin.
Planting out a sunflower-pumpkin patch. Spore-dusted seeds sprinkled and ready to go. Bed half planted (might be siesta!).
Covering planted seeds with a layer of rice straw to provide mulch and to protect the seeds. The thin layer of straw will provide enough cover to deter birds and other critters from eating the seed, will keep water from washing the seeds away, and will discourage neighborhood cats from claiming the veggie bed as a litter box.
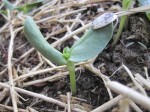
Pumpkin plant on its way! Note how the seed husk was lifted out of the soil and through the mulch layer by the young plant. Also note how the mulch is in place at germination -- the plant does not have to be disturbed -- it and its mulch pack are ready to go. Just add water and sunlight.
Young Sunflower Plant boasting its seed husk. Note the delicate young red-purple amaranth seedlings off to the right of the sunflower seedling.
Saving Happy Halloween Pumpkin Carving Seeds — 6 of 6
You have landed on Day 5 in this 6-day series of videos depicting the fine art of collecting/processing/storing pumpkin seeds. Enjoy!
First some pumpkin pics:
Day 1 = flowers
Day 2 = vine
Day 3 = new fruit
Day 4 = green manure
Today = seed saving
Day 6 = seed planting
THEN a video re “Saving Happy Halloween Pumpkin Carving Seeds”. 6 videos (1/day) for the series!
Seed Saving
Cold Storage Pumpkin. These pumpkin have been stored a few months since harvested last fall. Each pumpkin has seeds, so if the fruit does not look edible, perhaps it will provide good seed in a month. That fresh, viable seed can be dried, then planted. Note how the pumpkins were stored in an apple box; its pocket-hole liner allowed good ventilation UNDER the fruit.
Dandelion seed in bowl. A high-sided bowl was used to dry this light, easy-to-blow-away seed.
Drying Tomato Seed. A lot of moisture here; to protect the bookshelf (tray of seeds will be stored above to dry) a plastic cafeteria tray, newspaper, and office paper are used to soak up the tomato’s juices. Note the use of the fruit labels for easy labeling.
Sunflower drying over winter. A corner of this room is used to dry the sunflower because A LOT of debris will fall to the ground. A dropcloth under the drying stalks makes cleanup/harvesting fallen seed easier.
Sunflower head, dried, ready to have its seeds harvested.
Harvesting Sunflower Seed. I like to also harvest the dry pulp from the head and mix it in with the seed before planting. Benefit unknown re mixing in the pulp, but my gut likes the idea.
Harvesting Callendula Seed in a bucket. The still-alive and well plant is leaned into the bucket so that those seeds that are ready to fall will will not scatter and be lost (unharvested).
Yes, seed collecting is fun. And, don’t forget partly why we do it — to increase food producion and increase biodiversity. So what happens to those critters that get captured during our seed harvesting? Start by giving them a break!
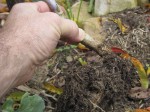
Allowing critters to escape from seed harvesting might be as easy as providing them access out. In this example, the bucket was rested on its side to allow critters to crawl out. Note the tucked-up-against-the-bucket hose bib. Nice to give the critters a chance to escape, but would be a bummer to have a breeze roll the bucket and dump all the seed — Nature’s way of saying, “These seeds belong HERE!” Note the escaping Thompson Jumper spider on the right.
Weevils Trapped In Holyhock Seed Bag. The pruners are being used to keep the trapped weevils from having to spend months in a plastic bag. Besides clearing my conscious (one of the weevils could be Grandpa Tony!), I also want to free these glorious ambassadors of biodiversity because they pollinated the holyhock in the first place.
Hey gang! I found it — this is the way out.
Saving Happy Halloween Pumpkin Carving Seeds — 6 of 6
You have landed on Day 4 in this 6-day series of videos depicting the fine art of collecting/processing/storing pumpkin seeds. Enjoy!
First some pumpkin pics:
Day 1 = flowers
Day 2 = vine
Day 3 = new fruit
Today = green manure
Day 5 = seed saving
Day 6 = seed planting
THEN a video re “Saving Happy Halloween Pumpkin Carving Seeds”. 6 videos (1/day) for the series!
Green Manure
Squash grown for green manure to establish new planting bed. The over-planted (like WAY TOO MANY!!!) squash and pumpkin vines will be harvested to create soil. Likewise, the vines could be "chop-and-drop'ed" in place and covered with soil -- the vines would become a rich source of compostable material as microbes, fungi, and critters (insects, etc.) break it down.
Tony harvests green manure (squash vines) to feed earthworms. Those are not just squash vines that have grown ridiculously abundandant. Those are sheets of moisture, sponges of sugar, and whole communities of resident microbes/insects. Earthworm bin, compost pile, under a new soil mound, the harvested squash vine is a delicacy for the garden.
Sure, composting can be rewarding. But frankly, I hate turning the pile. Permaculture slacker! But I do try to make up for some of my sins. My favorite use of green manure is to pile it and mound soil over it. I try to imagine the busy life of microbes/crawly critters/earthworms/mollusks/a rooting skunk all working the pile. Indentured servitude in my soil mound, and I have no guilt! In fact, I have provided jobs.
Green Manure from Norwegian Hill Basket.
Harvest from Norwegian Hill Basket. The fruit is nice, it's food. The squash flowers are very nice to have; they can be breaded and fried for a delicacy. The green manure, and a piled high wheelbarrow of it!, is Life worth living for, realized dreams, a reason to keep on going. We now have organic material to create healthier soil. Talk about riches!
And my favorite use of green manure — burying it. For one, I believe plants above the mound will have an easier time sending roots into the warm soil. Roots that seek the warmth and nutritious moisture that the breaking down greens provide will send roots along the loosely packed decayin greens and grow far and wide.
Leaf Trench Highway filled with green manure, including squash greens. LTH, our soil-making trench, stores our green mulch for six months to a year. The greens are layered with other garden assets, like brown leaves, rotten fruit, and twigs according to REMP standards. Invented by you, whenever you find the time, Real Estate Marketting Principles, are very effective in the garden -- what can you do to have microbes and critters big and small want to move in your mix of organics. For one, water the area. Once you attract the critters and microbes, relax. Harvest your compost-rich soil when ready.
Saving Happy Halloween Pumpkin Carving Seeds — 4 of 6


")


.")


")


 to feed earthworms")


