First a video re “Bucket Watering Can DIY 2of 4”, then some pics of the project (below the video):
Bucket Watering Can DIY 2 of 4 (video):
From the project (pics):
Cutting a fill hole in the bucket’s lid. The large hole allows filling the watering can easily AND can be used as a non-moving grip while watering garden.
Finding center opposite the watering can’s grip (the fill hole). The bucket was then flipped 180 degrees to locate the center of the holes to be drilled.
Spout holes are drilled to both the right and left of the center mark hole. The more holes, the wider the watering row-of-streams will be.
Happy DIY projects for your Habitat Food Forest. See you tomorrow.
First a video re “Bucket Watering Can DIY 1 of 4”, then some pics of the project (below the video):
Bucket Watering Can DIY 1 of 4 (video):
From the project (pics):
Setting up project space for converting a 5 gallon bucket (left foreground) into a dishwater watering can. Note our kitchen sink wash bucket (back of table) patiently waiting to be emptied into the new watering can.
The drill bit used to create a row of holes for the watering can. The drill bit has a central spike and 2 cutting edges on the side, like an auger (without the screw).
Marking the center spout hole — the drilling has begun! The new holes will be fairly close to the bucket lid so that most of the water can drain out when the bucket is tipped.
Using a utility razor knife to cut the fill hole. Not so easy as I thought the cut would be but the recessed plug ring helped guide the knife.
Happy DIY projects for your Habitat Food Forest. See you tomorrow.
First a video re “Planting Salvia spathacea next to Monica Manzanita Mannequin 2 of 2”, then some pics of “Monica Manzanita Mannequin animal habitat installation” (below the video):
Planting Salvia spathacea next to Monica Manzanita Mannequin 2 of 2 (video):
Monica Manzanita Mannequin animal habitat installation and planting Salvia spathacea (pics):
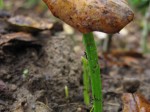
The west end of Cacti Caverns is cleared of lavarock. The “Monica” (species name) manzanita (Spanish for “little apple”) shrub will be planted on top of Cacti Caverns’ terra cotta flat roofing tiles.
The lower tile is slide under the top tile to make room for Monica Manzanita Mannequin animal habitat. Poor quality soil (high percentage of adobe clay) is removed to make room for planting (better quality) soil.
Tony’s last conversation with Monica Mannequin. Note the wavy wood grain, identifying the mass as a tree root burl. The “nose”, or upright projection (Hey, work with me here!), is the base of the trunk, which starts out a straight grain.
Monica Manzanita threaded through Mannequin. Soon critters will inhabit the inside vaulted ceilings and come and go through Mannequin’s crevices. A pole planted next to MMM serves as a handhold while traversing the walk path.
Monica manzanita a month after being planted. Looks happy to me! Not over watering is probably the biggest challenge this manzanita shrub will offer here in California, where it is a native plant.
After two healthy months, the typically very slowly growing shrub looks to be establishing itself. Grape Overpass is sporting bunches of green grapes that will ripen in a couple of months.
Hummingbird sage (Salvia spathacea) planted next to Monica Manzanita Mannequin habitat. The salvia, like the manzanita, is also a native plant that will thrive in the dry hydrozone garden bed.
Both hummingbird sage (Salvia spathacea) pose for a photo op next to Monica Manzanita Mannequin habitat. The critters will be happy!, especially in years to come when the manzanita tree canopies its undergrowth of hummingbird sage.
Happy animal habitat installations. See you tomorrow.
First a video re “Planting Salvia spathacea next to Monica Manzanita Mannequin 1 of 2”, then some pics of “Cacti Caverns animal habitat installation” (below the video):
Planting Salvia spathacea next to Monica Manzanita Mannequin 1 of 2 (video):
Cacti Caverns animal habitat installation and Planting Salvia spathacea (pics):
Roof view of driveway property line in 2010: From street, 1) sunflowers are growing in Canyon Wall Oasis (large cavity in ground), AND 2) cacti grow above Cacti Caverns. Note that the lavarock continues past Cacti Caverns to THE WORLD (especially if you are a tiny critter!).
Close-up of Cacti Caverns in 2010. Low profile above ground. Several small sheltered cavities below ground. Note the applewood tunnel in foreground and the 3-stack thick curved clay roofing tile tunnel in rear. All earthworks are critter approved!
On with the show! Let’s get this Hummingbird sage (Salvia spathacea) planted and shoot some film.
The two hummingbird sage will be planted between Cacti Caverns habitat and Monica Manzanita Mannequin habitat. Truth be told, the salvias are actually planted above one of Cacti Caverns buried roofing tile cavities.
Pics and captions from Tony’s new book, Habitat It and They will Come of Cacti Caverns animal habitat installation (pics):
Figure 4.52 Property line before Cacti Caverns installed. Zeroscape for miles and miles and miles. Time to change that. Cacti Caverns will provide a little greenery, a little nook and cranny, a little Life is what you make it! to this property line.
Figure 4.60 Planks held in place by rebar. The sturdy barricade will keep the rock in place during work. A worthwhile effort. Cascading creative ideas and manipulation of the moonscape into Cacti Caverns wonderland won’t have to be interrupted to replace rock landslides.
Figure 4.72 Flat Clay Roofing Tiles resting on tunnel. Gaps on both sides of the rounded log section will shelter (fill in critters of your choice) . Note shovelful of soil used to anchor tile in place; the soil will be washed down to settle both sides of the tile. Lavastone will rest directly on the tile’s flat surface.
Figure 4.94 Three Years Later. next pages Cacti Caverns has matured. The cacti have grown paddle upon paddle upon paddle, a delicate flowering ivy has spread throughout, and Sea Creature has silvered (aged gracefully, they say). Wood destined for the garden (in background, out of focus) awaits its turn alongside Cacti Gardens. A wary garter snake has crawled out of the thicket of ivy and cacti, and rests on the fencepost. Even more exciting than the snake itself (in our garden!) was watching it retreat from my pestering photography down into the ivy-obscured entrance of the applewood tunnel.
Happy animal habitat installation. See you tomorrow.
First a video re “Planting Garlic”, then some pics of “Young Garlic Plants AND Leaf Mulch” (below the video):
Planting Garlic 6 of 6 (video):
Young Garlic Plants AND Leaf Mulch (pics):
Rows of young garlic and yellow onion sprouts. The shallots, planted in the foreground soil (next to the collard), have yet to sprout – the best for last!
Garlic, yellow onion, shallots, and collard veggie bed along the sidewalk. Sure beats a lawn! Note the light covering of oak leaves as mulch, a good erosion protection from the winter rains.
Tree collard cuttings 3 weeks after propagation. Some cuttings have been chewed down by snails or slugs, but others are going to thrive past that onslaught of Nature. Sometimes you win, sometimes you lose. Plant enough cuttings to confuse the confounders! And, some of the collard cuttings will make it.
Shallot stalk, “Do you like my (oak leaf) hat?”
Rains are coming, so I fetched some sidewalk leaves to mulch the garlic/onion/shallots/collard veggie bed with. Cleaning up the sidewalk gives me plenty of rich, partially broken down leaves. The leaves were also used to extend the veggie bed in Tipped Wine Barrel (see blog entry next week?).
Garlic harvest from our sidewalk garden – Straw Bale Recliner Veggie Bed. Note how the garlic was rinsed to remove soil from the roots. The rack (a discarded baker’s tray) will allow the garlic to dry. Nice job, Frau Glory!
Happy mulching your veggie bed with leaves. See you tomorrow.
First a video re “Planting Garlic”, then some pics of “Garlic, Yellow Onions, and Shallots Planting Completed” (below the video):
Planting Garlic 5 of 6 (video):
Garlic, Yellow Onions, and Shallots Planting Completed (pics):
Straw Bale Recliner Veggie Bed planted with garlic, yellow onion, and shallots. The dark red dust is blood meal, an attempt to keep local cats from using the unmulched soil as a litter box.
A raccoon paw print IN THE BLOOD MEAL! The raccoon walked over the bed the first night of the planted crop. Well at least the soil does not look torn up by animals digging deeper in the soil or by cats using the veggie box as a litter box.
Happy planting garlic, onions, and shallots. See you tomorrow.
First a video re “Planting Garlic”, then some pics of “Garlic Bulbs Dusted with Spore” (below the video):
Planting Garlic 4 of 6 (video):
“Garlic Bulbs Dusted with Spore“ (pics):
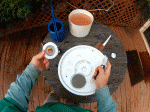
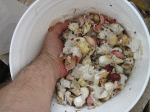
A bucket is used to break apart garlic bulbs into individual gloves that will be planted. The garlic papers will be strewn on top of the planting bed’s soil for mulch and nutrition.
Garlic cloves are moistened with water to thinly coat with mycorrhizal spore.
Happy planting garlic, onions, and shallots. See you tomorrow.
First a video re “Planting Garlic”, then some pics of Tree Collard Planting (below the video):
Planting Garlic 3 of 6 (video):
Tree Collard Planting (pics):
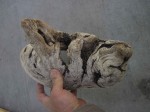
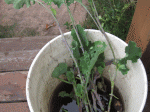
The tree collard cuttings to be planted next to our sidewalk garlic bed came from this full grown tree collard. We harvest collard leaves to eat; the stalks leftover become cuttings to be propagated.
Tree collard cuttings to be propagated. Draw a line between the pruners and the leather sheath – that’s the expected soil line for the cuttings.
Tree collard cuttings left to thrive in water till planted SOON! The bucket contained rainwater and fallen leaves, a rich organic soup for the cuttings. Bacteria, fungi, and microbes in the water? Absolutely! And perhaps that’s a good thing. When I find out I’ll get back to you.
For more of Tony’s blog entries on tree collard, see:
First a video re “Planting Garlic”, then some pics of Soil Making in Leaf Trench Highway (below the video):
Planting Garlic 2 of 6 (video):
Soil Making in Leaf Trench Highway (pics):
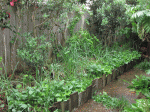
Leaf Trench Highway, a fedge (food hedge) and soil-making trench along our garden path. The veggie bed lasagna layer of compostables include (bottom to top): alfalfa straw, fresh greens (prunings and weeds), dead sticks and leaves, hay straw, hot (newer) horse manure, compost soil, mulch, and plants growing through the mulch.
View from Salamander Resort (the barrel pond is Salamander Sunny Swimhole) to Leaf Trench Highway. The “highway” refers to the trench’s habitat connectivity ability – the habitat food forest trench is a pathway between Salamander Resort animal habitat AND Cottage Pond animal habitat, which is under the deck in the background.
See blog entry 20121120 Patio Veggie Pots 6 of 6 for more pics of soil making in Leaf Trench Highway AND how the veggie bed not only makes soil but also provides animal habitat and habitat connectivity.
Skyward Pumpkin harvested, taken down from its altar in the crosshatch of bamboo teepee trellis poles. Note the forced out-of-round shape; almost hurts to look at! Also notice the cozy spider web in the cracked-open vine. A red-backed Thompson’s jumper is tucked away, hoping we will GO AWAY!
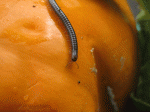
Millipede in Skyward Pumpkin vine. So much for hiding – this millipede was very concealed in the pumpkin vine till I split the vine open to look for critters. Judging from the mess in its room, I would guess this is an adolescent millipede 🙂 . Note the hollow structure of the vine that invited the millipede in; I have cracked the vine in two, spreading the halves open like a book.
Skyward Millipede on the move, all kazillion legs. Note the millipede’s segmented antennae and how each body segment has 2 legs on each side of the body. Watch out, millipede, you're headed for Skyward Pumpkin’s butt crack!
Skyward Millipede further on down the road. How graceful!
Figure 4.194Right Side Up. Some of this millipede’s characteristics include: doesn’t bite (but does release a cyanide-based fluid that STINKS!), mostly a scavenger of organic debris, short antennae, slow crawler, legs are tucked under the body. Most of those characteristics are in contrast with a centipede’s: centipedes are fast, long-antennaed, predatory, and pack a mean bite. Figure 4.195 Up Side Down. Same millipede, probably more annoyed at this point.
Happy planting garlic, onions, and shallots and see you tomorrow.
 Cutting a fill hole in the bucket’s lid. The large hole allows filling the watering can easily AND can be used as a non-moving grip while watering garden.
.") Finding center opposite the watering can’s grip (the fill hole). The bucket was then flipped 180 degrees to locate the center of the holes to be drilled.
Finding center opposite the watering can’s grip (the fill hole). The bucket was then flipped 180 degrees to locate the center of the holes to be drilled. Spout holes are drilled to both the right and left of the center mark hole. The more holes, the wider the watering row-of-streams will be.
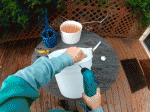


 planted next to Monica Manzanita Mannequin habitat.")
 next to Monica Manzanita Mannequin habitat.")

.")

 shows off Tony and his camera gear before being planted.")


 hat?”")


.")


 and soil-making trench along our garden path.")


.")
.")